Intro
Addons in active development refer to an unreleased develop branch or a pull request, which could be for a feature, enhancement, bugfix, or maintenance request.
Testing the AYON server ( frontend and backend) in active development is a different topic.
Essential Requirements
First, download and install Python on your computer.
At the time of writing this guide, we recommend using Python version >=3.9.1 and <3.10, as this is the version used in most of our codebase, such as the ayon-launcher.
Get the Source Code
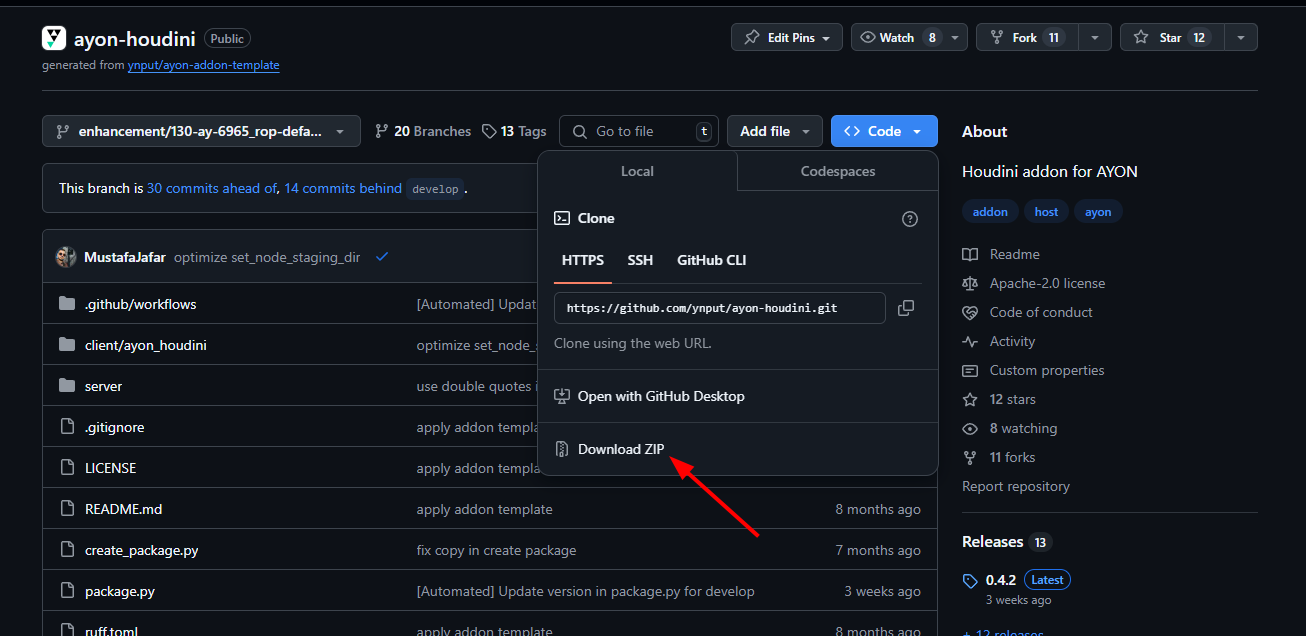
You can download the source code directly from GitHub using the Download ZIP button.
NOTE: This ZIP file includes the source code, but it won’t work with AYON as is. To make it work, you’ll need to build the addon package
.zip.
On any pull request, you’ll find a link to the repository branch that includes the source code.
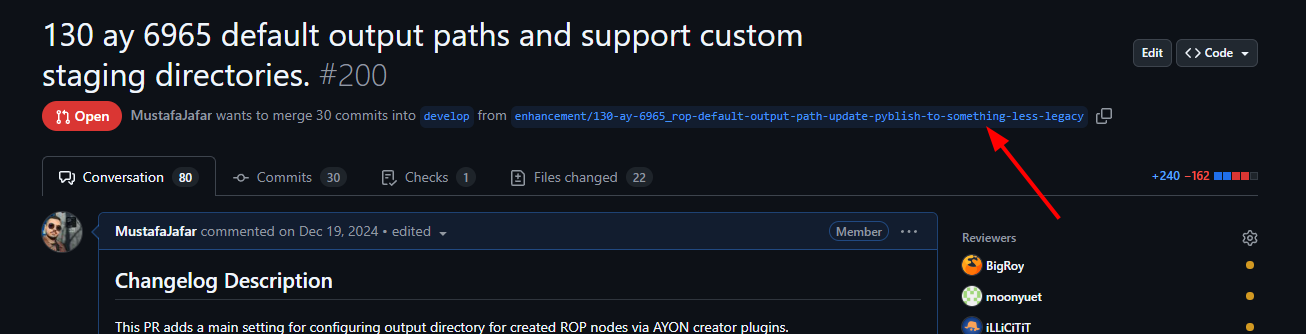
Clicking that link will redirect you to the branch. From there, click Code and then Download ZIP.
AYON: Build and Install Addon Package
To use the addon in your pipeline, follow these steps:
-
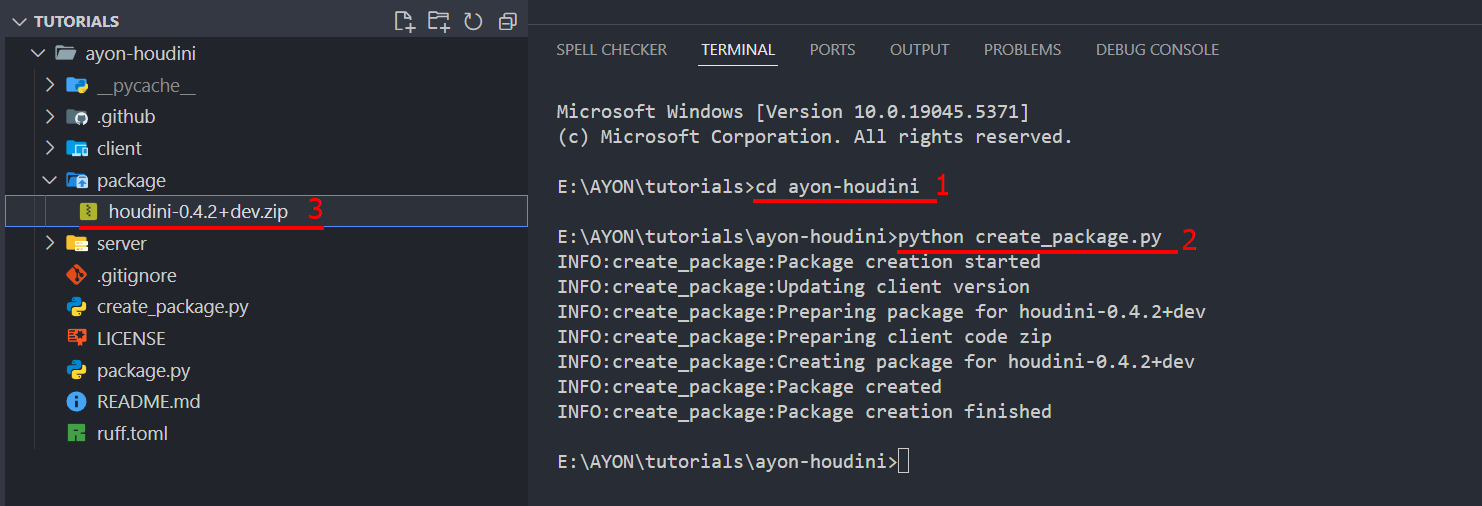
Create a
.zipAddon Package: Usecreate_package.pyto create a.zippackage in the packages folder within the repo. Note: The version number follows package.py.cd ayon-houdini python create_package.py -
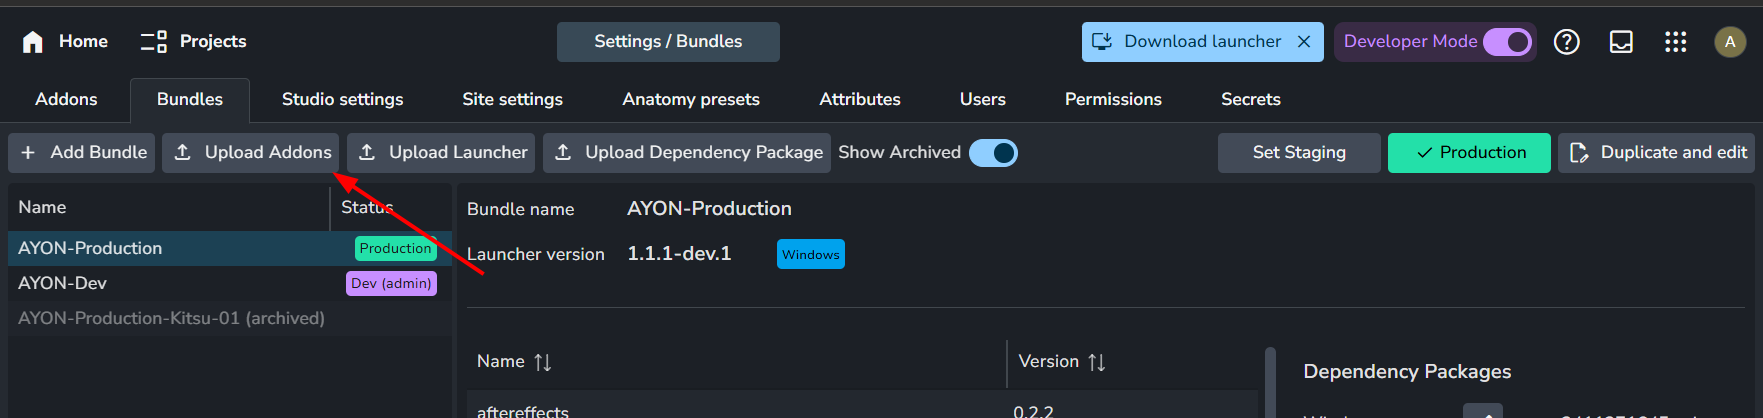
Install the Package into Your Pipeline:
- Upload the package to the AYON Server via Upload Addons button. A popup will appear where you can drag and drop your
.zippackages.
- Duplicate/Create a bundle | AYON Docs and add or update the addon in it.
- Update/Add a dependency package. For more info: Dependency Packages | AYON Docs
- Set the bundle to
productionorstaging.
- Upload the package to the AYON Server via Upload Addons button. A popup will appear where you can drag and drop your
Tips for Devs
Get the Source Code using Git
This is an alternative for Get the Source Code.
Get the Source Code using Git
The first step to start testing the addon is to get the code from our codebase to your machine. This involves:
- Clone a Repository: Download a repository.
- Add Forks: Add forked repositories to your clone so you can pull branches from them too.
- Switch to a Branch: Download and switch branches.
- Update a Branch: Explore different ways to keep your branch up to date.
Keep in mind that some of these steps are typically done only once. For example, once you clone a repo, you don’t need to clone it again since it already exists. Similarly, once you download a branch, you only need to pull updates instead of downloading it again. If you do download it again, you’ll need to merge the updates with the existing branch.
Clone a Repository
To clone a repository, use the git clone command in the terminal.
First, get the repository URL from GitHub.
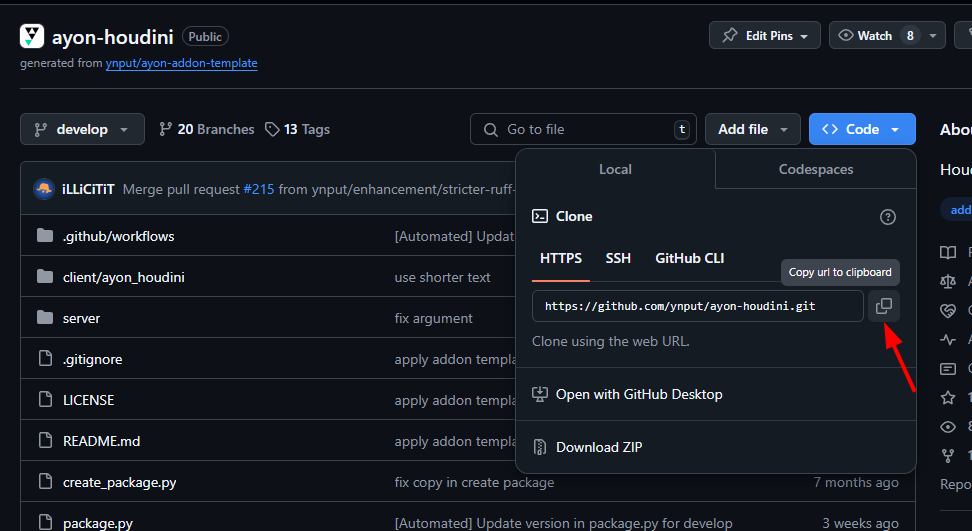
Next, open the terminal in your desired directory and run the clone command. This creates a folder containing the addon code.
git clone https://github.com/ynput/ayon-houdini.git
Here’s how it looks on my side.
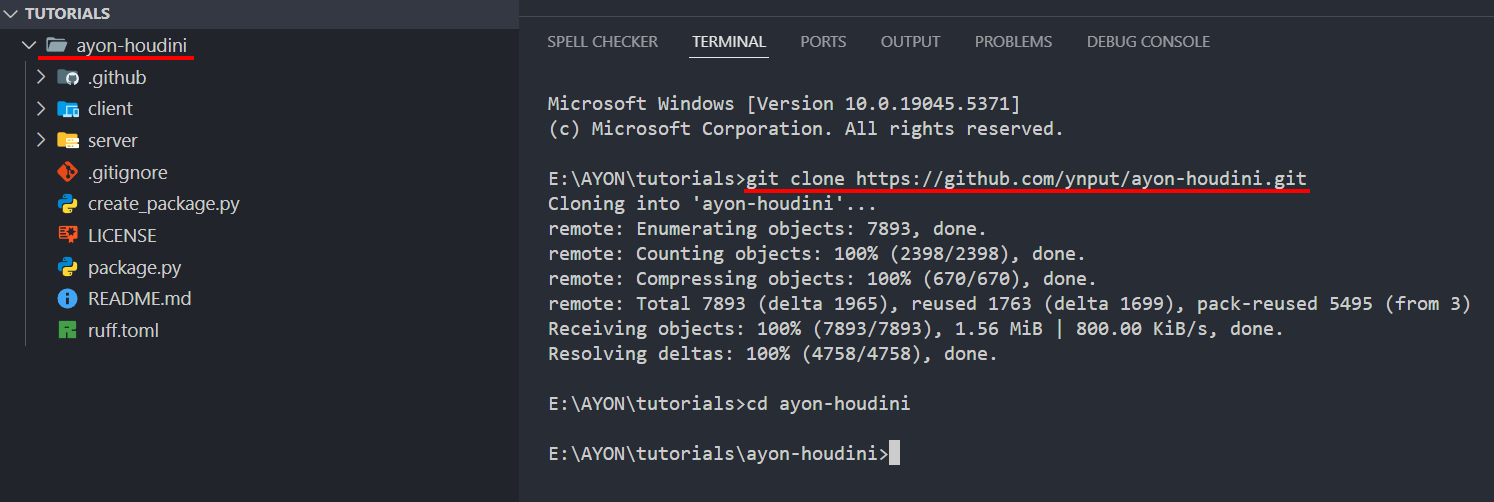
Later in this guide, I’ll use the
cdcommand to navigate directories. I assume you’re already familiar with this.
Add Forks
In GitHub, forks are copies or duplicates of the original repositories. Adding forks is important because it allows you to pull branches from different forks across the entire community.
Now, let’s add BigRoy’s ayon-houdini fork as an example. You can get the forked repo URL in the same way as the previous step.
To add a fork, use the git remote command with add:
cd ayon-houdini
git remote add BigRoy https://github.com/BigRoy/ayon-houdini.git
Note how I used BigRoy’s GitHub handle (
BigRoy) as the remote name.
You can then show the list of remotes using the git remote command without any arguments.
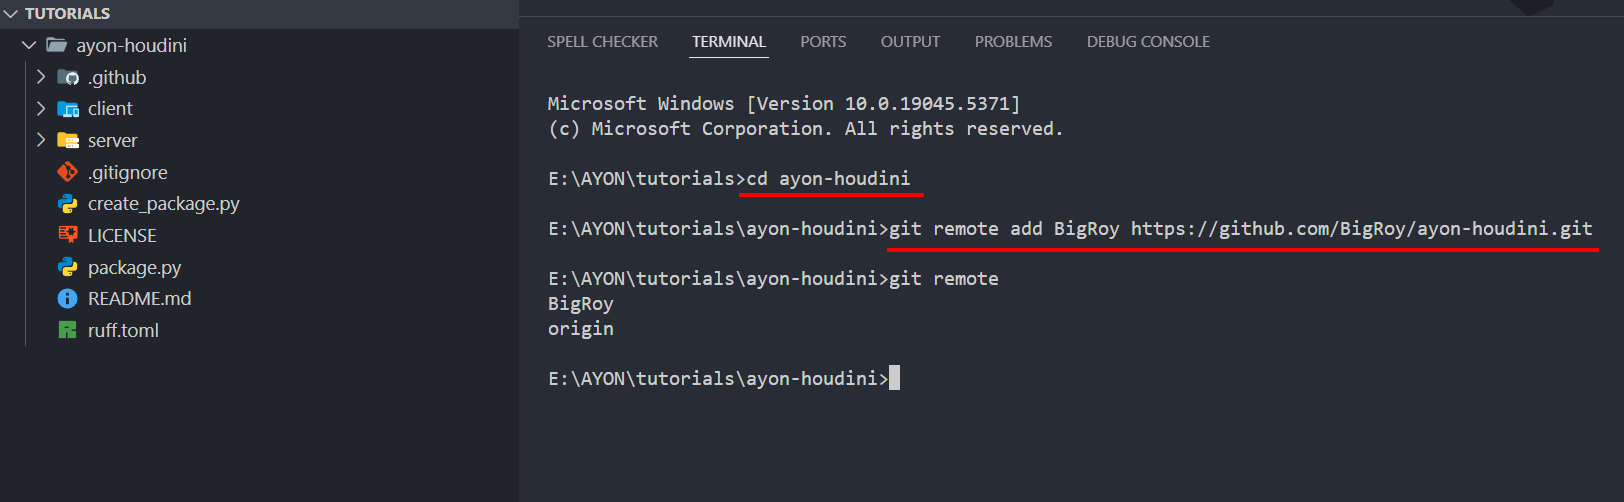
You can see we now have two remote sources:
origin: This refers to the repo we cloned initially, which is the official repo.BigRoy: This is the fork we just added.
Switch to a Branch
Before switching to a branch, you need to download it first using fetch, and then switch to it using checkout.
Switch to a Branch from origin
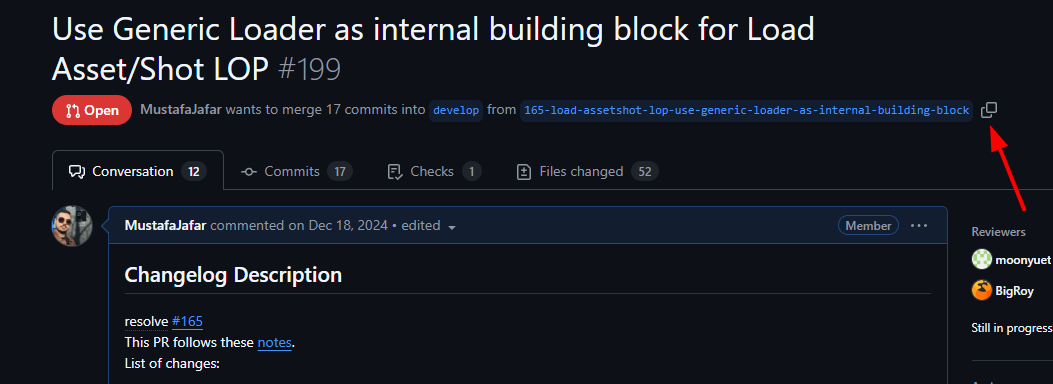
To get the branch name from a PR, you can find it at the top of the page. For example, see Use Generic Loader as internal building block for Load Asset/Shot LOP #199.
cd ayon-houdini
git fetch origin 165-load-assetshot-lop-use-generic-loader-as-internal-building-block
git checkout 165-load-assetshot-lop-use-generic-loader-as-internal-building-block
Switch to a Branch from a fork
Some PRs come from forks, which you can identify by a : colon in the branch name, formatted as <github_handle>:<PR_name>. In this case, use the PR name without the GitHub handle.
For example, see Collapse loaded paths to AYON project root env vars #212.

cd ayon-houdini
git fetch BigRoy enhancement/houdini_loader_collapse_path_to_ayon-vars
git checkout enhancement/houdini_loader_collapse_path_to_ayon-vars
NOTE:
Most of the time, the fetched branch will be the same. If there are any conflicts, it will be named as<github_handle>/<PR_name>, e.g.,BigRoy/enhancement/houdini_loader_collapse_path_to_ayon-vars. It’s worth checking the command log to see which name was picked.
Update a Branch
When updating a branch, there are two methods (you can replace origin with any remote name):
- Pull Updates
This method directly pulls updates from the remote branch.cd ayon-houdini git checkout develop git pull origin develop - Fetch and Merge
This method fetches updates first, then merges them into your branch.cd ayon-houdini git fetch origin develop git checkout develop git merge origin/develop
AYON: Run addons live from source
It doesn’t fully replaces AYON: Build and Install Addon Package but it makes testing easier, faster and more robust.
AYON: Run addons live from source
AYON Developer mode lets you test client-side pipeline code live from an addon code. Keep in mind, if the addon code includes changes in addon settings (server-side of the addon), you’ll still need to upload the addon package to the server and then update your dev bundle.
To learn more:
Dev Automations using AYON Dev Workbench
Some dev automations that helps automating some steps.
Dev Automations using AYON Dev Workbench
Find my workbench here: AYON Development Workbench
In my daily development work using VS Code, I’ve created some automations to help me complete mundane tasks faster. For example, instead of manually running python create_package.py, navigating to the AYON server, clicking the upload button, and dragging my addon, I simply run my create and upload an addon VS Code task/automation.