This is a draft community guide to serve as starting point for the documentation
This post is a WIP and will be edited in the coming days. You reading this now is not recommended AND ![]() frowned upon (just kidding, feel free to provide early comments or questions.) But note that it may be skipping parts here and there or just plainly suck.
frowned upon (just kidding, feel free to provide early comments or questions.) But note that it may be skipping parts here and there or just plainly suck.
Note: If you’re facing USD workflow specific issues that are not global ‘workflow’ related questions those are best kept for a separate community forum post! So, you may want to report issues you have in a separate topic.
Chapters
 Getting started: publishing your first asset and shot
 AYON USD Contribution Workflow
 AYON Houdini USD Workflow
 AYON USD Frequent Issues | FAQ
 USD Asset Structure Guidelines
 Further Reading: USD Knowledge
TODO Chapters?
Ayon USD Asset Resolver
Maya Workflow
Blender Workflow
Unreal Workflow
For now I’ll skip the What is USD? and Why use USD? and get straight to building assets and shots.
Getting started
Creating an asset
The producer has his ![]() pointing at you and needs the asset now!
pointing at you and needs the asset now!
When we are referring to the USD asset, we mean the asset with both the model’s geometry and the look’s materials and textures. The USD structure (simplified) then becomes:
asset.usd
  - look.usd
  - model.usd
Where the look is applied over the model inside the asset.
Creating the model
From a Maya, Houdini or Blender perspective
TODO: Add visuals - maybe short video recording
We will want to create our geometry’s contribution to the asset.
For the asset structure it’s critical we work within the asset’s hierarchy so that USD referencing works. (consider that USD mumbo jumbo for now)
As such, we’ll always work within a root group with the current folder (asset)'s name.
Say our character’s folder path is assets/char_hero then the root group is char_hero
We can make a hierarchy like:
char_hero/
    geo/
        body
        pants
And yes, cool heroes wear no shirts. ![]() Only pants
Only pants ![]() .
.
When done. We publish that char_hero as USD contribution to the model layer.
The publishing logic will make the layering of the model.usd into the asset.usd for you automatically.
So no we have:
asset.usd
    model.usd
When loading that in, we’ll have our hero wearing pants.
But it needs some ![]()
![]() paint.
paint.
Creating the look
From a Houdini perspective
- Reference the asset so we have the model.
Note the word “reference” here. We are usually not “sublayering” the asset USD file
-
Make sure to add a “layer break”. This special Houdini node breaks off the USD scene above it and from that moment on any changes on the existing hierarchy are just opinions that are overlaid on top of it. This means that when writing out a USD file now we’re not re-exporting the geometry itself, but only any changes we make after the layer break.
-
Apply your materials to the
char_hero/geomeshes and make sure your materials are withinchar_herogroup as well. So usually you end up with:
char_hero/
    geo/
       body   <- material 'char_hero/mtl/body_shader' applied
       pants  <- material 'char_hero/mtl/pants_shader' applied
    mtl/
        body_shader
        pants_shader
- Publish as the look product type (which is a USD look in Houdini).
Creating a shot
TODO: Add visuals - maybe short video recording
Houdini perspective
- Quickly, reference the asset.
- Throw some lights into the scene.
- Set up the USD Render Settings.
- Publish your USD render submission to Husk Standalone
You are now the USD champion - until they ask you about asset variants, LODs, purposes and a layered shot structure, and more. Easy, cowboy!
Running production
TODO: Add more production examples
- Show usage of variants of models and materials
- Show overriding materials in Lighting department for a Loaded Asset
- Show render submissions
- Show rigged character publishing to shot, with cloth/fur after by FX department
Frequent issues
I do not see my model on loading the asset
On Load warning message "Unresolved Reference Path" shows
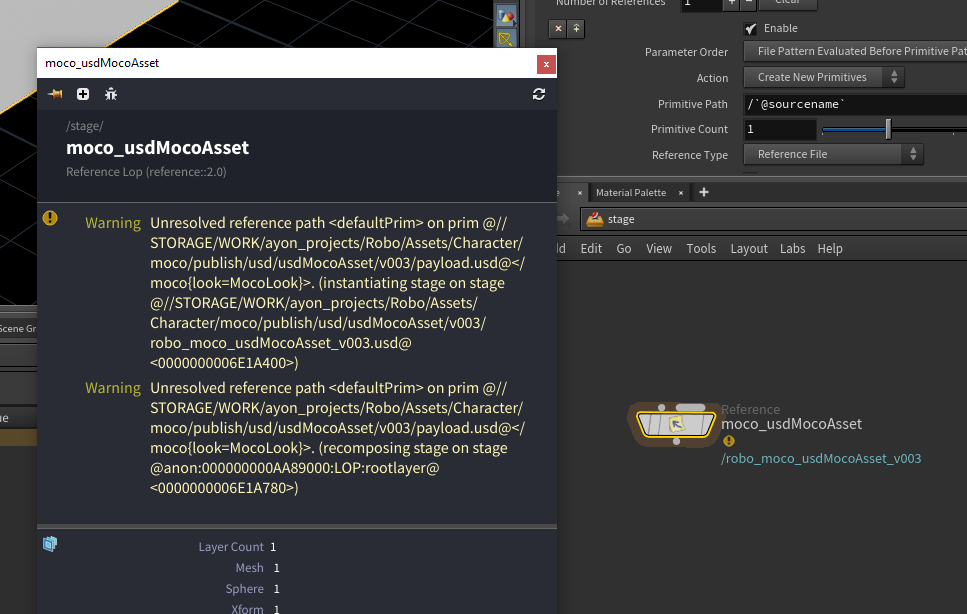
Since you’re publishing into the asset structure make sure your data is inside the expected default primitive path for that asset, where the default primitive is always {folder[name]} so your data should be inside /{folder[name]}/... so that the data resides inside the default primitive path.
This is wrong: ![]()
/geo/marble
/materials/material1
This is correct: ![]()
/char_hero
    /geo/marble
    /materials/material1
You are lacking the default primitive it expects.
What are all these publisher options, like Target Product?
Some technical details explained by @MustafaJafar
USD Publish Settings explained
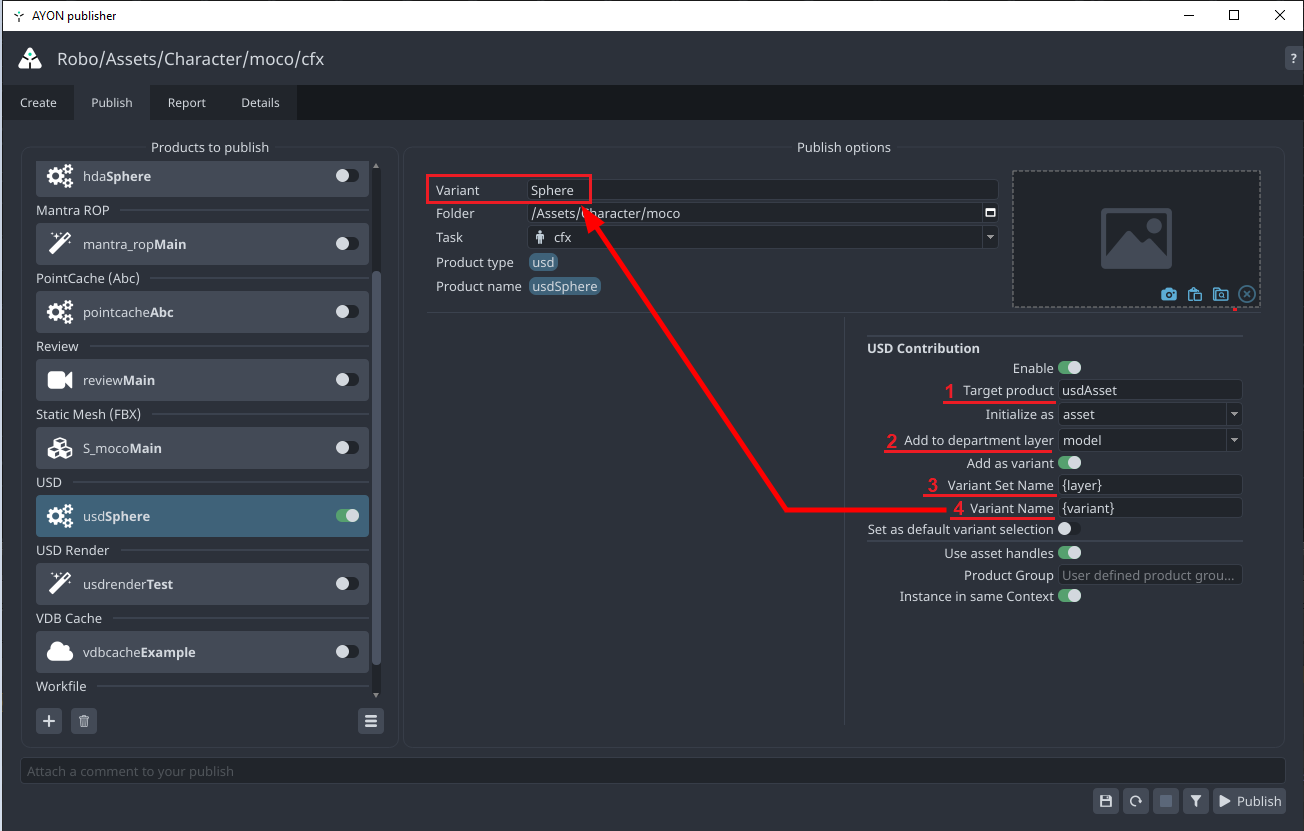
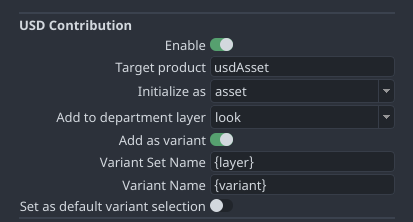
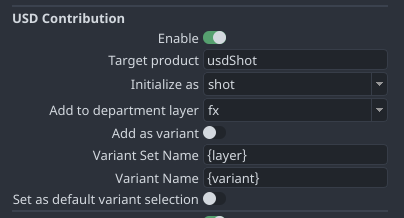
I’ll just focus on 4 interesting settings.
target-productwhich is a user editable text.target-product_department-namewhich is a selection from a drop down list. and users/admins can’t change the items in the list.variant-set-namewhich is by default is set to{layer}which evaluates to the selected item in the drop down list in Num2variant-namewhich is by default is set to{variant}as the arrow in the screenshot points.
Asset Structure
The asset structure is based on:
- ASWF Guidelines for Structuring USD Assets
- Nvidia/Omniverse’s Principles of Scalable Asset Structure in OpenUSD
But, let me summarize the results.
When enabling Asset Contribution + Add as Variant
[!NOTE]
I love how the asset definition is readable!
Any data in the asset defintion are static. They are computed on publishing.
Paths can change when using AYON resolver.
List of departments, layer-ids and order are hardcoded and not exposed yet to settings.
Product: target-product
# USD Asset
{target-product}.usda
  └── Xform {folder[name]}
        ├── inherits __class__/{folder[name]}
        └── payload ./payload.usda  # Relative path

payload.usda
  └── mata data
        └── sublayers
              └── {target-product_department-name}.usda:ARGS:{layer-id}, {order}
Product: target-product_department-name
# USD Asset Layer
{target-product}.usda
  └── Xform {folder[name]}
        ├── Variant Sets -> ["{variant-set-name}"]
        └── Variant Set "{variant-set-name}"
              └── Variant {variant-name}
                    ├── reference -> Published AYON usd product variant file path
                    └── custom data
                          ├── ayon_order
                          └── ayon_uri -> AYON URI for the published AYON USD product variant
Product: AYON-product-variant
# USD product
{AYON-product-variant}.usd
# It can be any hierarchy.
When enabling Asset Contribution without Add as Variant
It still add a variant! I think there might be a bug or I did something wrong…
Also, I’ll update this section once it works on my side.
When disabling Asset Contribution
[!NOTE]
It doesn’t affect the version in the latest publishedtarget-productortarget-product_department-name.
Product: AYON-product-variant
{AYON-product-variant}.usd
# It can be any usd hierarchy.
We need to manually rename primitive paths the whole time?
We use reference so we can manually enter the primitive path, but i don’t think that should be the way to go, they should all be connected and work without renaming and further input.
You should not need to manually rename all referenced primitive paths for assets
Using the AYON USD Contribution Workflow manual ‘re-assigning’ all the time for assets should be redundant for the majority of the workflow. (Preferably this should never be needed, but some sections like animation from shot layers may still fall outside of that scope.)
- Use the AYON USD Contribution workflow where the asset build is built automatically from single product contributions into the root primitive.
- Load the
usdAsset- avoid using the indidiviual layers, you should not need to load those individually since they are all in the main asset.
Now, in a shot based workflow you’d just load the asset and since e.g. Maya animation caches are not already overlaid over a USD asset structure that is one of the moments where you will need to define the path you’re overlaying to.
That’s usually like:
- Reference the
usdAssetinto your shot’s structure, e.g.
/asset/char_hero
Which may result in e.g. an asset with model and look:
/asset/
    char_hero/
        geo/..
        mtl/..
(The “char_hero” is the prim where you have the reference to the usdAsset)
What you need to make sure to do is that anything you want to layer on top of your asset comes in with the same hierarchy, so an animation cache preferably also has the structure:
char_hero/
    geo/..
With the animated geometry only. That you can then also reference on top of /asset/char_her in the shot structure which makes your referenced asset (that already has materials) move because just the geometries are being overridden.
Keep in mind the layer strength - referencing lower in the hierarchy means a stronger opinion!
It’s usually important to reference on the same root prim of the asset, because as soon as you e.g. reference over asset/char_hero/geo instead your reference is lower in hierarchy than any reference on a higher prim like asset/char_hero and hence will ALWAYS be the stronger opinion.
Additional context
- Ayon Core USD workflow PR contains some comments and explanations
- In the original OpenPype PR description it contained quite some ‘test’ videos
- At FMX 2024 an OpenUSD presentation was given that showed usage of what is basically the functionality of this PR.
What’s next?
- Improving the UX of the workflow - get it into artist’s hands, receive feedback and improve to simplify and streamline the approach.
- Support a dedicated Ayon USD Asset Resolver to use AYON entity URIs to be resolved with runtime, with support caching and pinning -
ayon-usd-resolver- And easily make it accessible to studios (ready-to-go builds and downloads from Addon Market, etc.)
- Providing dedicated Ayon USD editing tools to manage existing USD assets and shots and their contributions, as part of the
ayon-usdplug-in. - Multi-shot workflows, e.g. in Houdini
- Providing easy access to USD viewers from e.g. standalone Loader to “view” your published USD shots and assets quickly
- Publish from Maya RIGs directly to USD layers over a USD asset (preferably even by starting from a USD asset to begin with and swapping to the animation rig from it)