Why We Built This
We are a very small team of 2 people working to create narrative animated shorts. We have worked on a few shorter narrative commercials and tried to build things the old fashioned way by manually managing everything in a complicated stack of folders in the file browser. This system was slow and painful to update, especially once we hit the full scale of our project with all the scenes. You can see what we made here (https://www.caliper.tv/seri-sustainability).
The pain of creating this project immediately started us down a path exploring how we could do this better. After a lot of searching and trying different things we found AYON and specifically this presentation (https://www.youtube.com/watch?v=E6wCAi1i1ZY&t=3196s).
Seeing what was possible with this set of assets aligned perfectly with the parts of our workflow that did work. So we spent about a year learning and developing out all of the parts and pieces in our downtime to make this work for ourselves.
AYON is the foundation that makes all of this possible. It manages every file and version, runs publishes through validators to ensure consistency, and gives us a common asset language that works across Maya, Substance Painter, Houdini, and DaVinci Resolve. Once we committed to AYON as the glue, everything else fell into place around it.
What follows is a full walkthrough of our environment production pipeline — from the first rough blockout through to a finished, fully textured assembly ready for shooting and animation. Hopefully any other small artists like us can find some value in the system we’ve built here.
Full disclosure up front any scripts in this breakdown were generated using claude and I can almost guarantee will need some sort of cleanup, but they do function for us so we are including all of them here to be used if you want.
The End Goal
The goal of this part of the pipeline is to eliminate the repetitive work of breaking an environment down into individual assets for production tracking.
It all starts from a rough blockout of the entire space primarily structural elements and surfaces: walls, counters, tables, floors. That blockout becomes the blueprint for everything you’ll need to build. The names you were going to give those objects anyway now also drive your AYON asset list automatically.
From there, each asset has a roughed-in geo to start from, which makes moving through modeling much faster. Open the asset, start working no setup, no file hunting.
That philosophy carries through every stage. As much of the constant file management and scene setup as possible is handled automatically, so you spend your time on what actually matters: the work itself.
Once everything is complete, the final scene reassembles automatically from the finished assets at the assembly stage. The greybox becomes a simple, low-pressure space to focus on design and art direction and then drives the entire pipeline, full circle, back to a fully realized version of that same idea.
Quick Overview
- Greybox — Block in the space. Name assets
_usd, duplicate instances_v###. Clean transforms, freeze, delete history. Run locator script to auto-generate_LOCnulls. PublishmodelGreybox+usdGreyboxLOCto AYON. - Breakdown — Open breakdown task through AYON, verify greybox loaded, cook the network. Auto-creates one AYON asset per
_usditem with tasks and a centeredgreybox[assetname]product. - Asset Track (per asset, in parallel)
- Modeling — Refine geo, unwrap UVs. Publish
usdModellayer. - Texture — Bake from High poly + ID maps, build materials. Publish texture maps.
- Lookdev — Wire textures into MaterialX, inspect in Karma. Publish
usdLooklayer. - assetFX — Additional FX layer as needed.
- Set Dress — Place secondary props using full greybox as context. Publish triggers second breakdown wave for new assets and produces
usdSetDressLOC. - Assembly — All
usdAssets+ LOC data auto-load. Assets snap into position by name matching. PublishusdEnvironment.
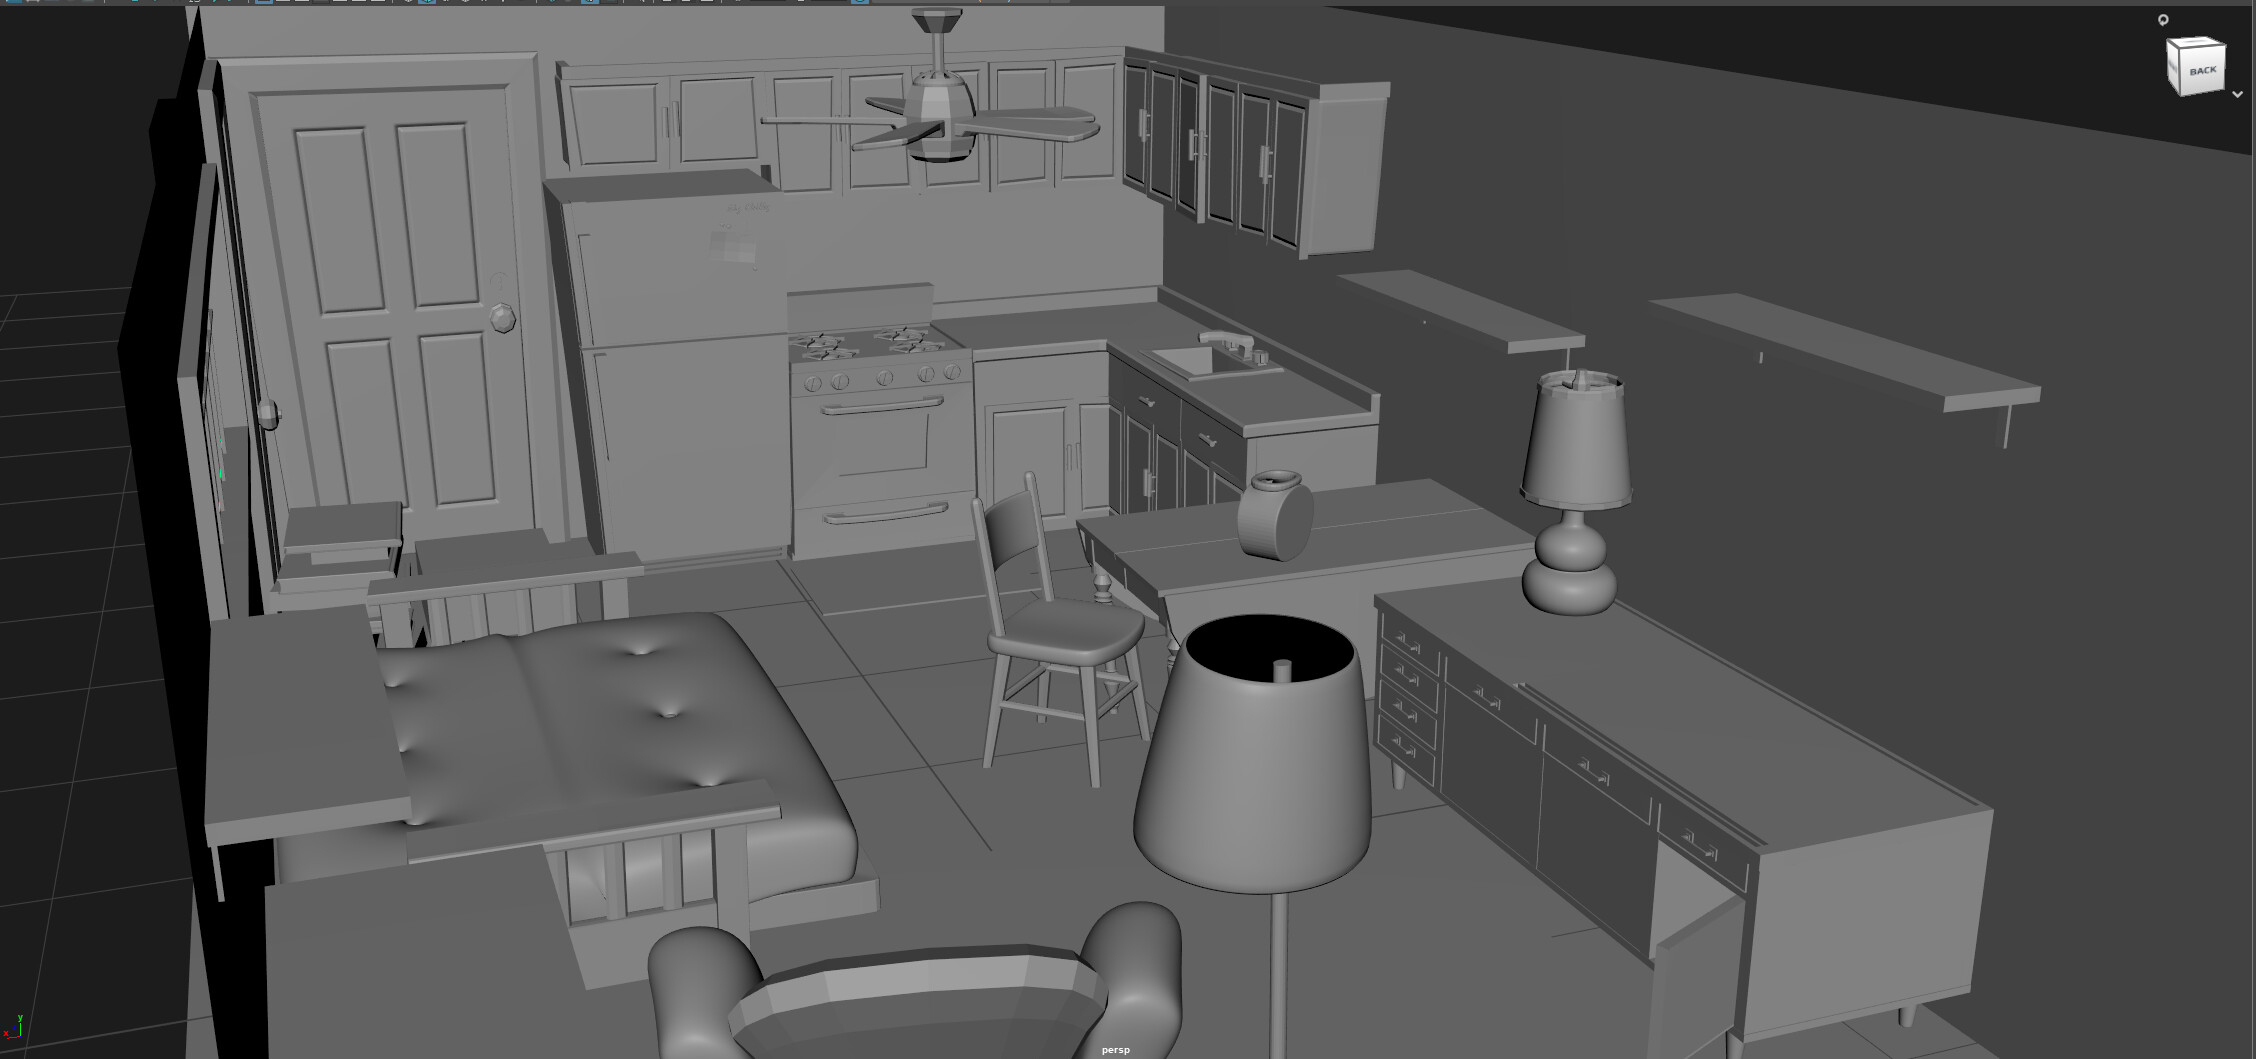
Stage 1: Greybox
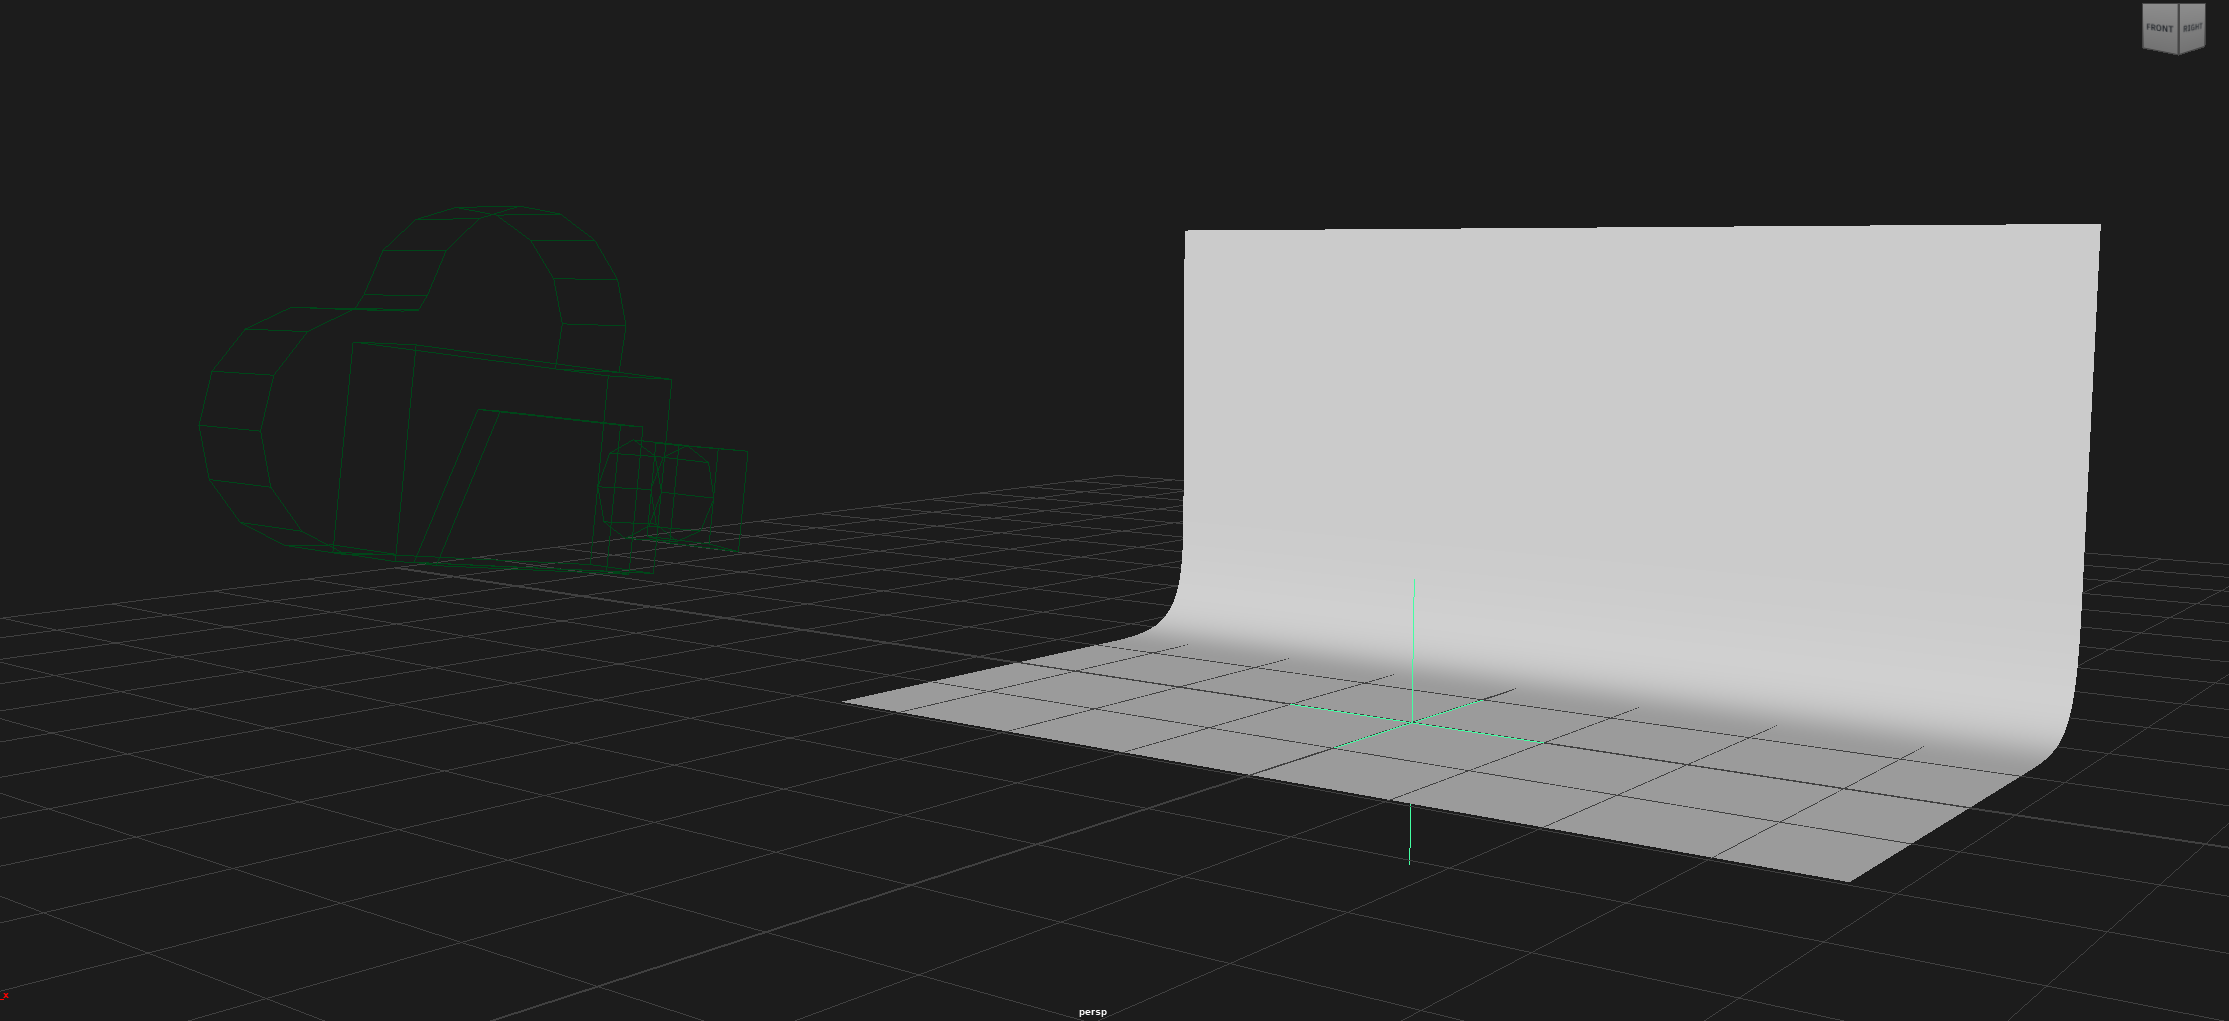
Every environment we build starts with a greybox. A rough compositional blockout focused entirely on what belongs in the space and where, before any real asset work begins. This is also prior to even creating assets in AYON since we found more often than not it was almost impossible to call out everything you were going to want to add to the scene and later track through production.

We work primarily in Maya for this, though the process is DCC-agnostic. The sources are a mix of KitBash3D Cargo assets, found assets from online libraries, and hand-modeled blockouts for anything we can’t find. At this stage we’re just shopping around and figuring out what feels right.
Naming Convention
Once the composition feels good, every object you want to become a pipeline asset gets renamed according to a simple convention. This naming is what drives all the automation downstream, so it has to be clean and consistent.
- Master asset:
assetname_usd(e.g.chair_usd) - Duplicate instances of the same asset:
chair_v002,chair_v003, etc.
Any duplicates of the same object are just _v### — you only want one published asset per unique item, and the pipeline handles the instancing automatically.
Asset Cleanup
Before anything gets published, every asset needs to be cleaned up properly. The downstream automation depends on clean transforms.
- Center the parent null pivot at the base or primary mounting point of the asset
- Center the object in world space.
- Freeze transforms
- Delete history, unlock normals, remove stale nodes (or equivalent in your DCC)
- Move the asset into its final position in the scene after all of the above. This should leave you with clean transforms on all named assets before sending them into the pipeline
The Locator Script
Once everything is named and cleaned up, you run our locator script(maya). It reads the scene, finds every _usd and _v### object, and automatically generates a matching _LOC null at the same pivot position for each one. These locators are what carry placement data into the final assembly step.
Auto Locators (maya).txt (9.4 KB)
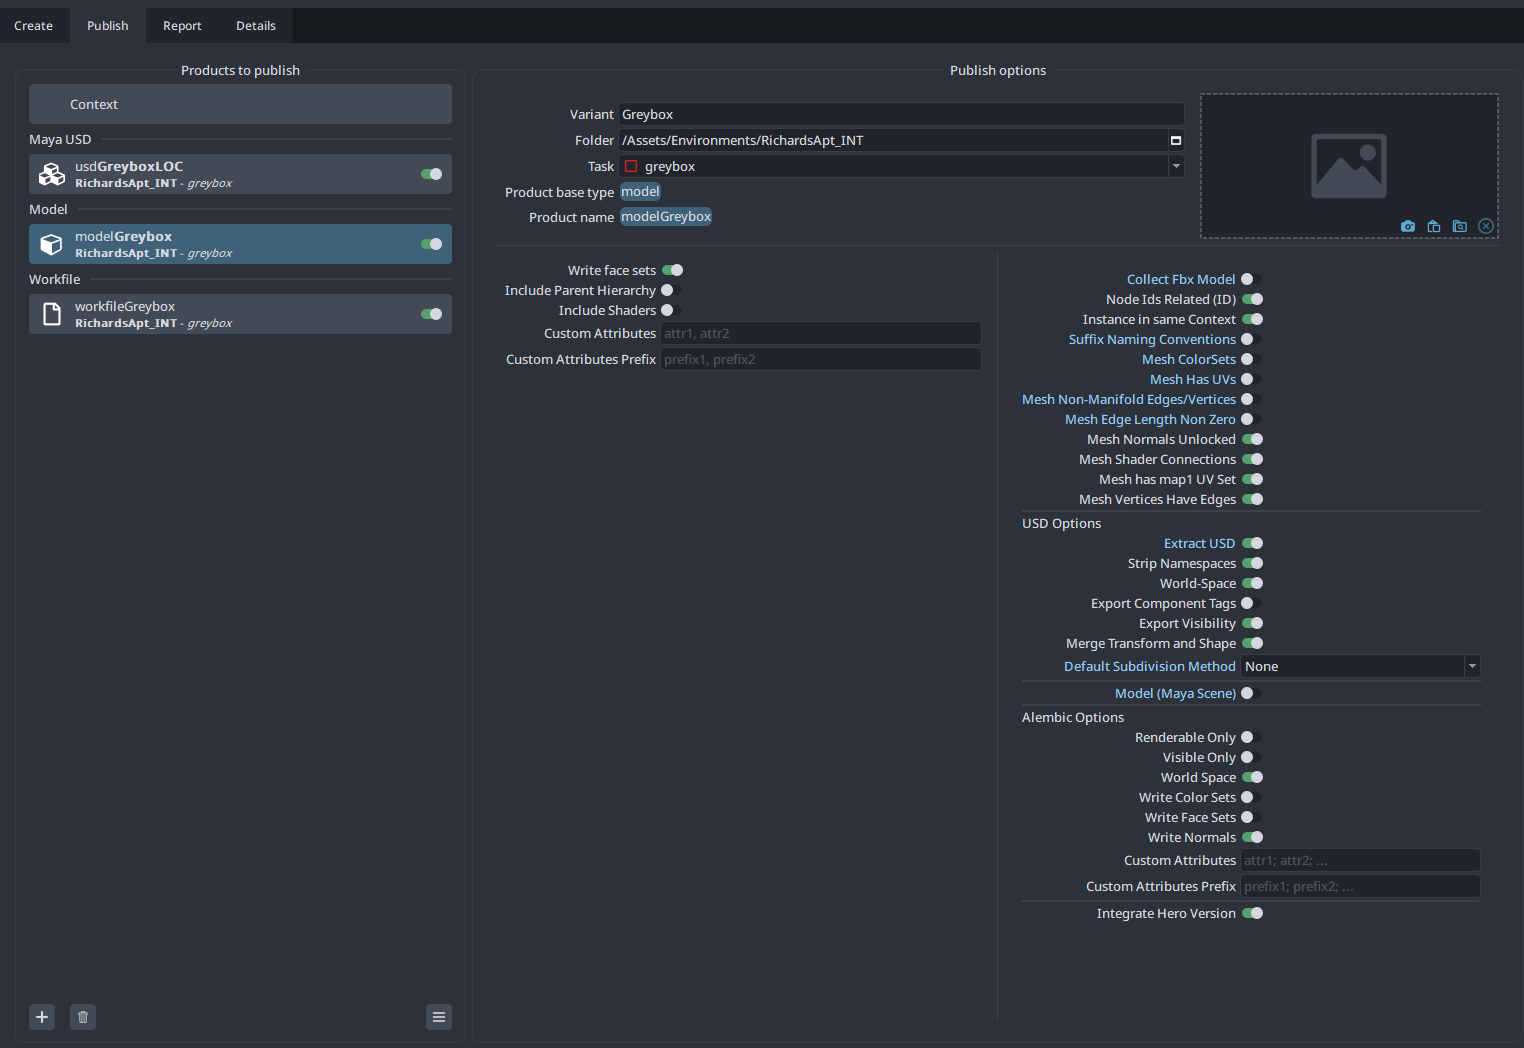
Two Publishes Out of Greybox
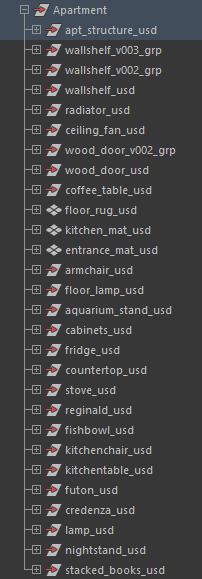
Everything gets collected and published to AYON as two separate USD products:
modelGreybox— all_usdand_v###assets under a single parent null. The Maya workfile also publishes automatically alongside this.usdGreyboxLOC— all_LOCnulls under their own parent null. This is the placement data layer.
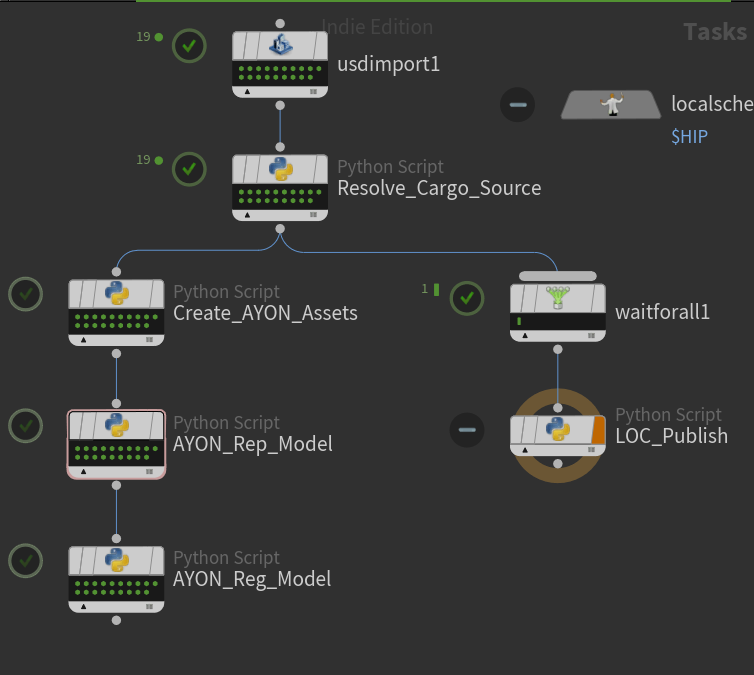
Stage 2: Greybox Breakdown
This is where the greybox becomes a fully scaffolded AYON project.
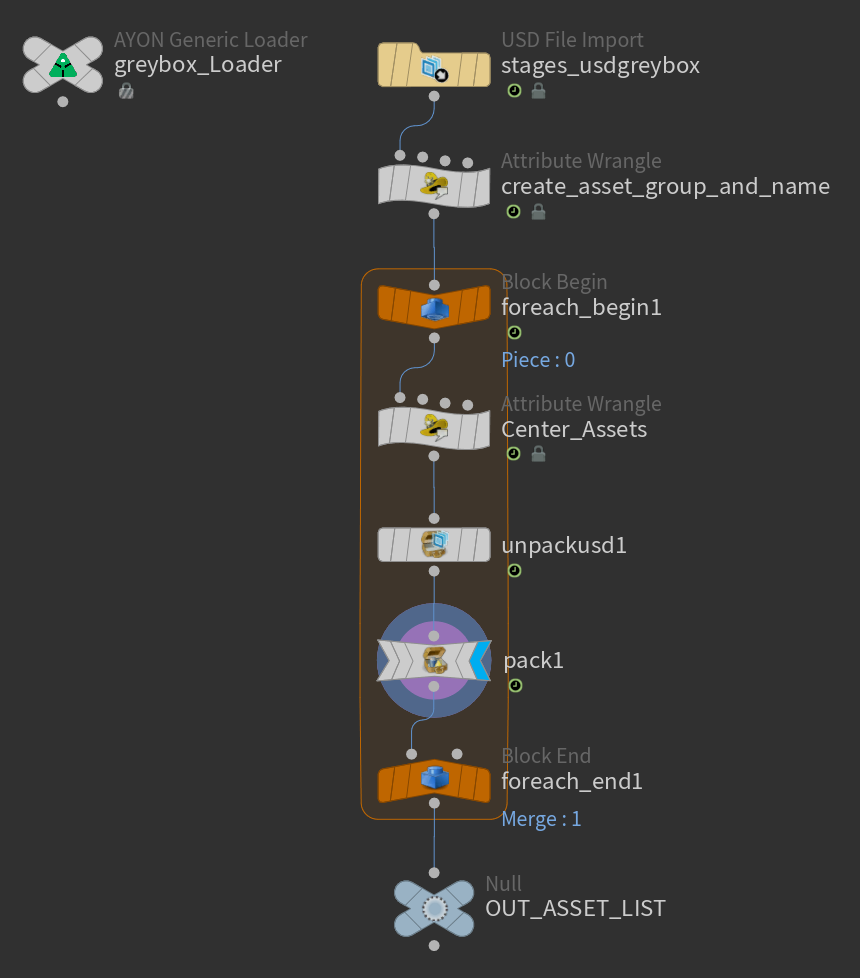
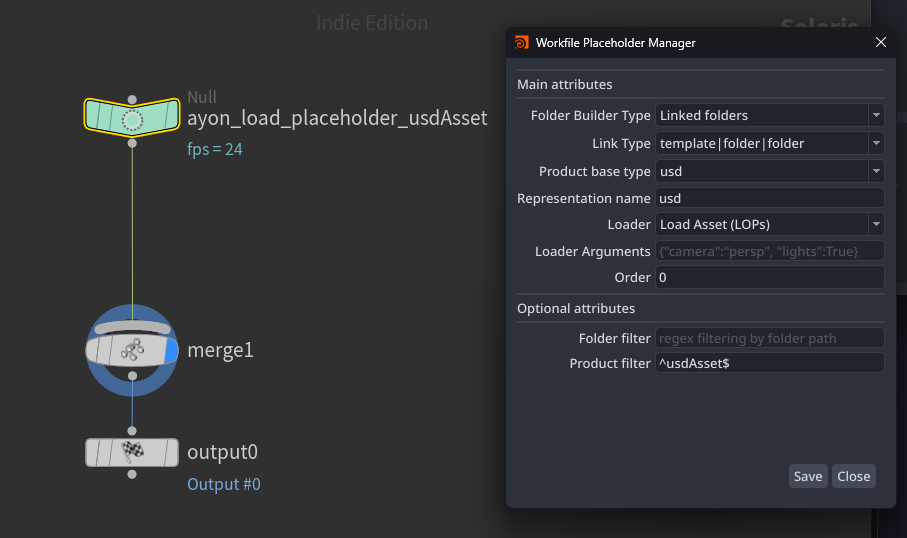
You open the breakdown task through AYON, which launches Houdini with the breakdown template pre-loaded and the modelGreybox USD already in the scene through template loaders. Verify everything looks correct, then cook the TOPs network.
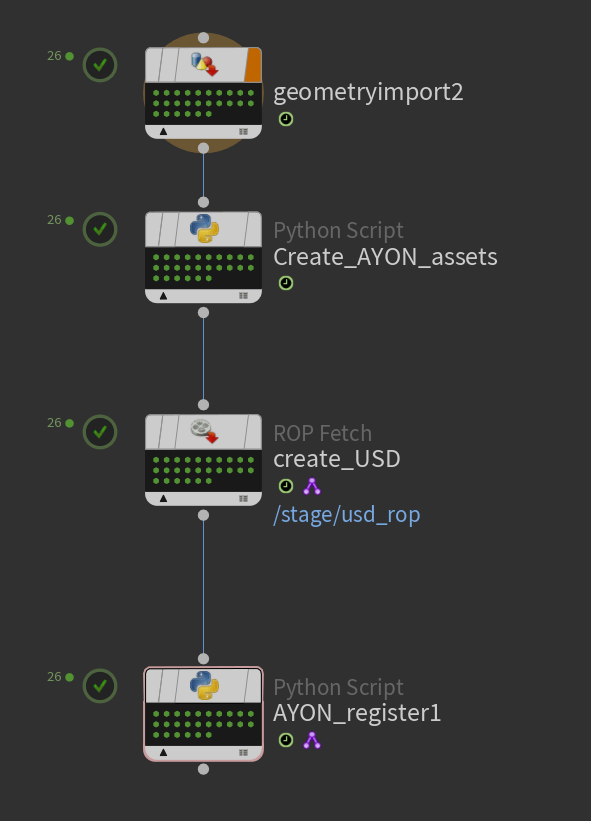
Create Ayon Assets(breakdown).txt (13.8 KB)
RegisterAYON_Greybox(breakdown).txt (9.2 KB)
The network does the rest automatically:
- Reads every
_usdnamed asset from the greybox - Extracts each one and centers it in world space
- Creates an AYON asset entry per unique asset
- Publishes a
greybox[assetname]product for each — the clean, centered, isolated geo that starts the asset track - Creates 5 tasks on each asset:
sketch,modeling,texture,lookdev,assetFX
_v### duplicates don’t get their own asset entries. The network recognizes them as instances of their primary version and handles them accordingly. Any variants are created later and are swappable with variants at assembly time.
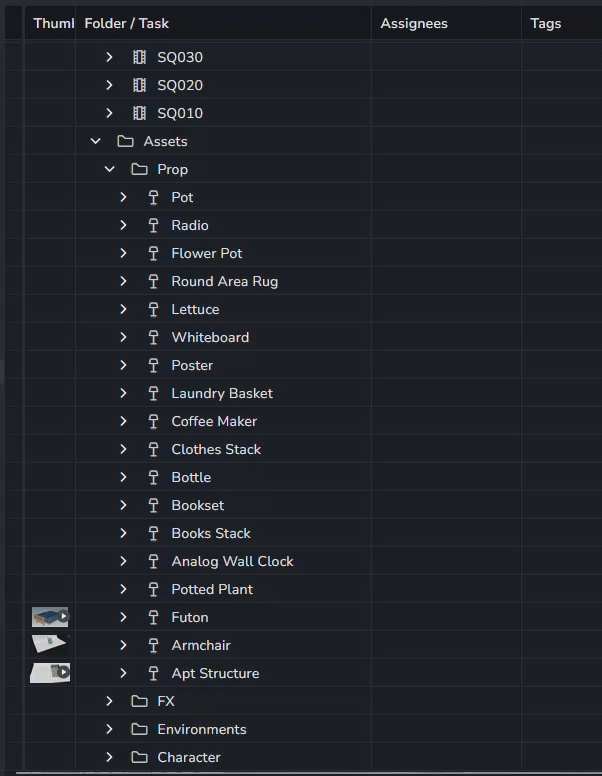
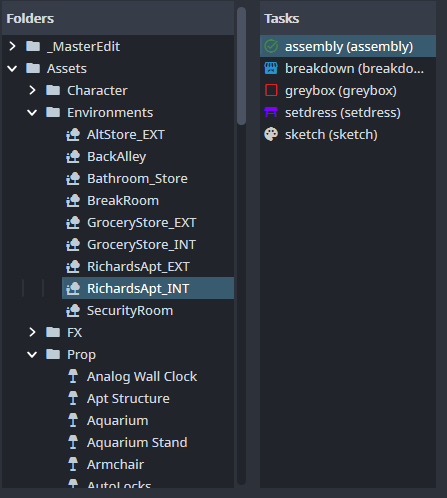
After breakdown runs, your AYON project goes from one modelGreybox publish to a fully populated asset list — every item has its own item in AYON for tracking and task structure, ready for production.
Stage 3: The Asset Track
From here, every asset runs its own independent production track.
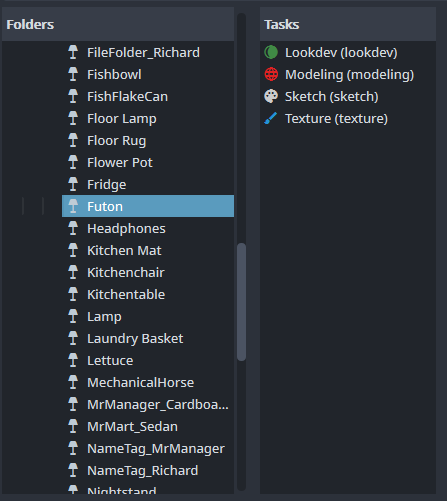
Sketch (optional)
For hero assets that need concepting before modeling begins, the sketch task is fully open — any DCC, any format, publish whatever is needed. No strict requirements here.
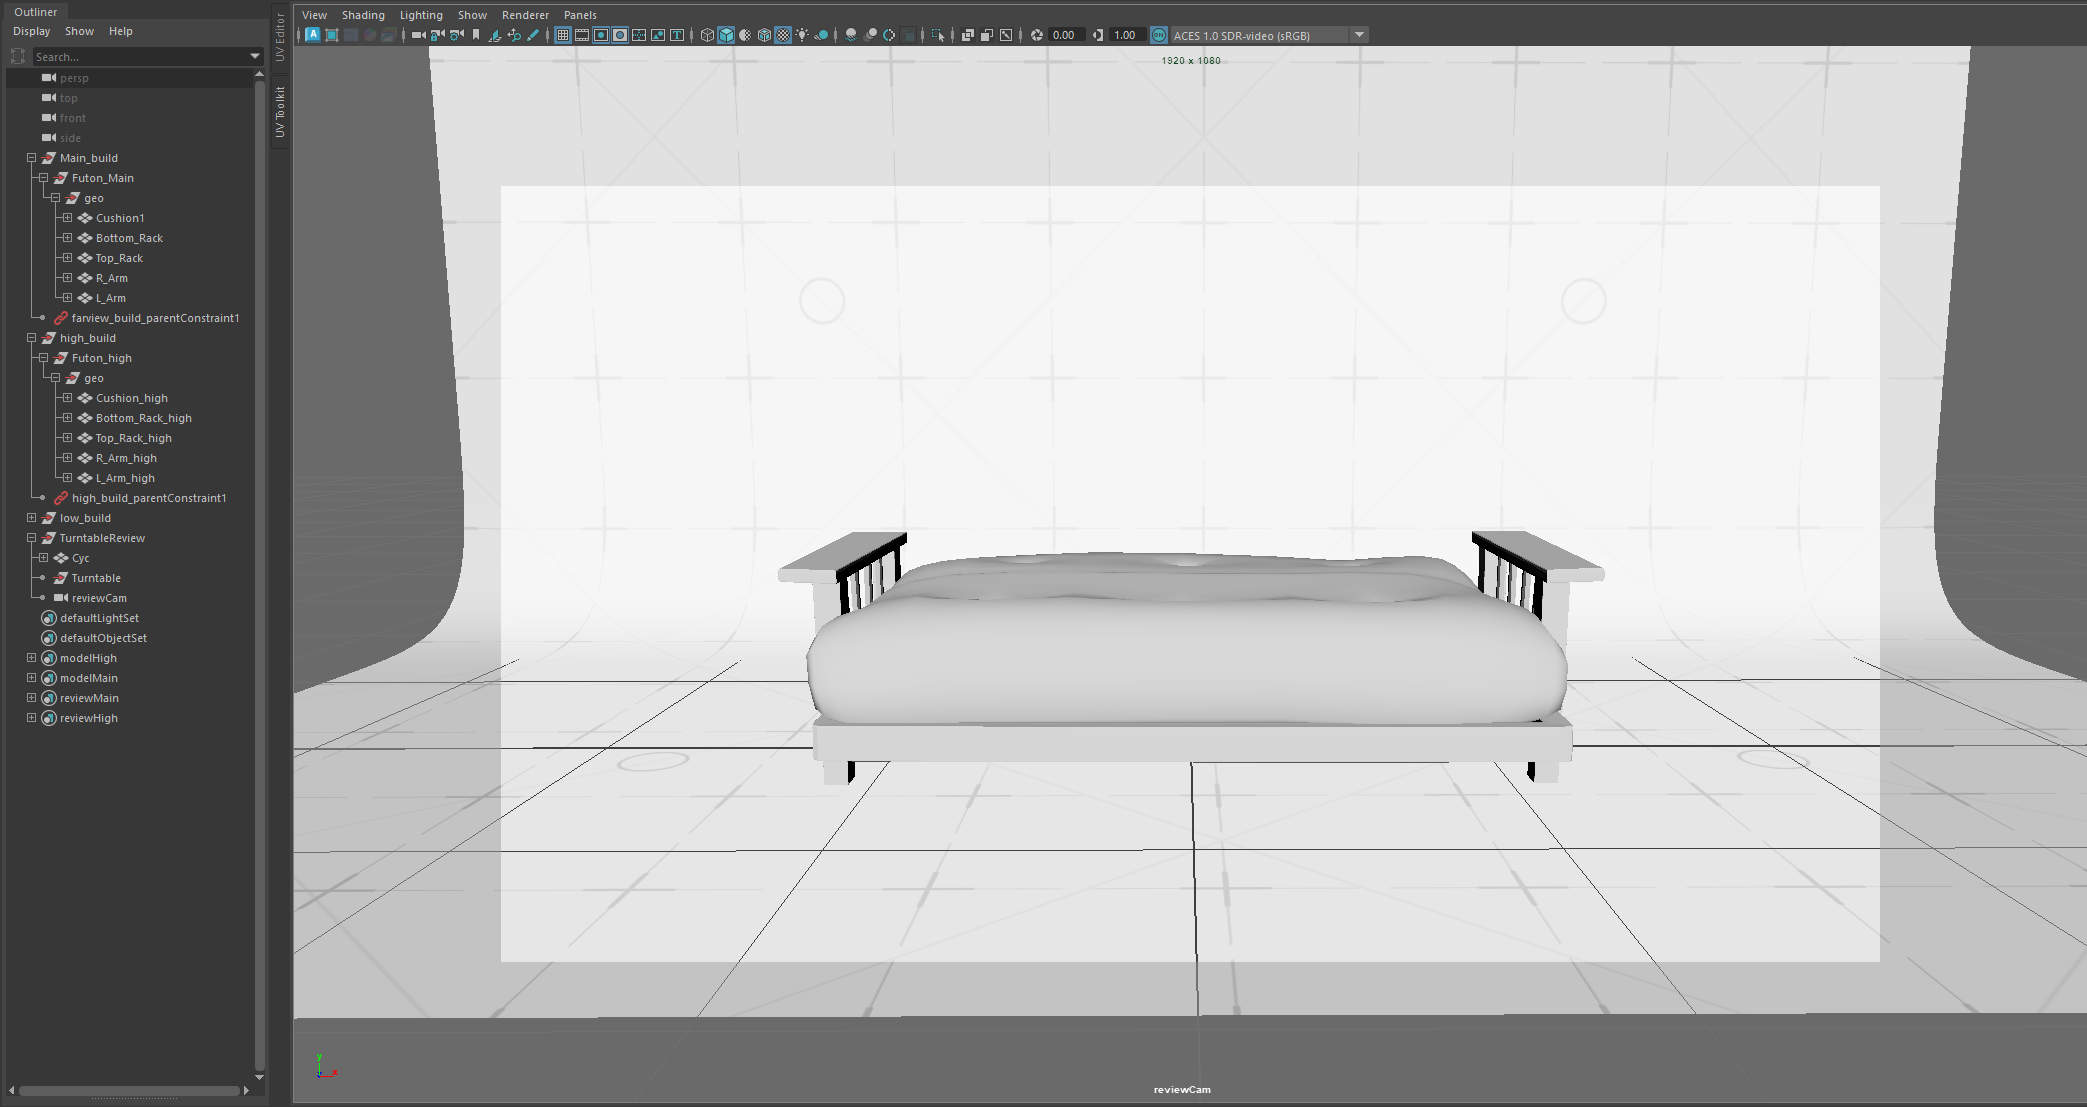
Modeling (Maya)
Launch from the AYON modeling task. Maya opens with a template pre-loaded that includes:
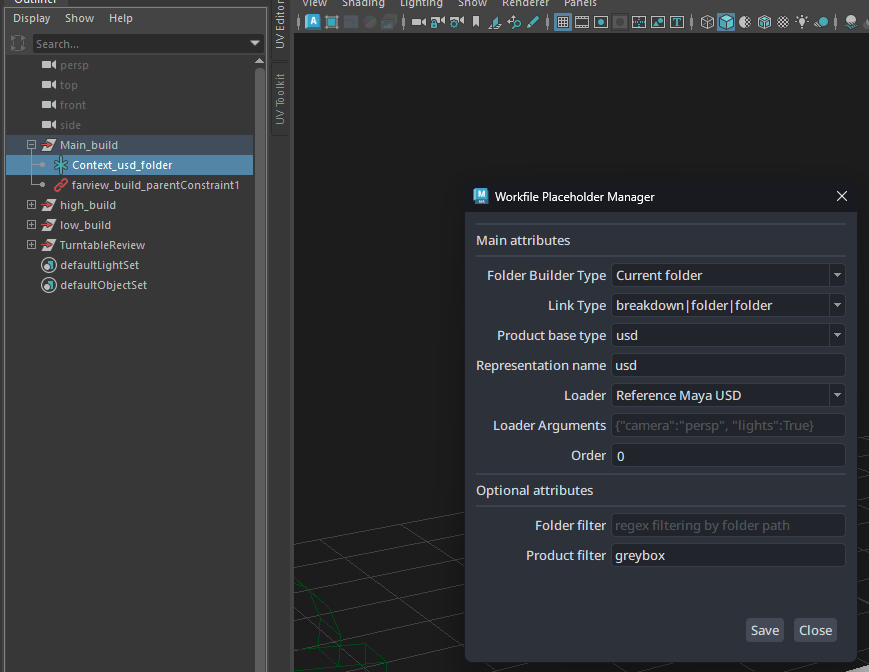
- Main model workspace
- High poly workspace
- Low poly workspace
- A cyc wall and camera for review renders at publish time
- The
greybox[assetname]product auto-loaded as a starting reference
Use Maya layers to keep the scene organized — you’ll want to be able to hide the cyc wall and helper nulls while you’re working.
Pivots: The asset must have a parent null with its axis set to the primary anchor point when modeling is complete. The final pivot doesn’t need to be a 1:1 match to the greybox if adjustments were needed, but the anchor logic must be maintained.
UV: UVs need to be packed and unwrapped as part of this task, before publish.
The three model variants:
- Main — the final model with the intended texture set layout. This is the primary deliverable.
- High — higher poly version for Substance Painter baking and ID map generation. A baking tool, not the final asset.
- Low — for proxy\LOD use
The modeling publish starts the USD contribution workflow. In the AYON publisher, set the publish type to usdModel layer. This becomes the geometry layer of the usdAsset.
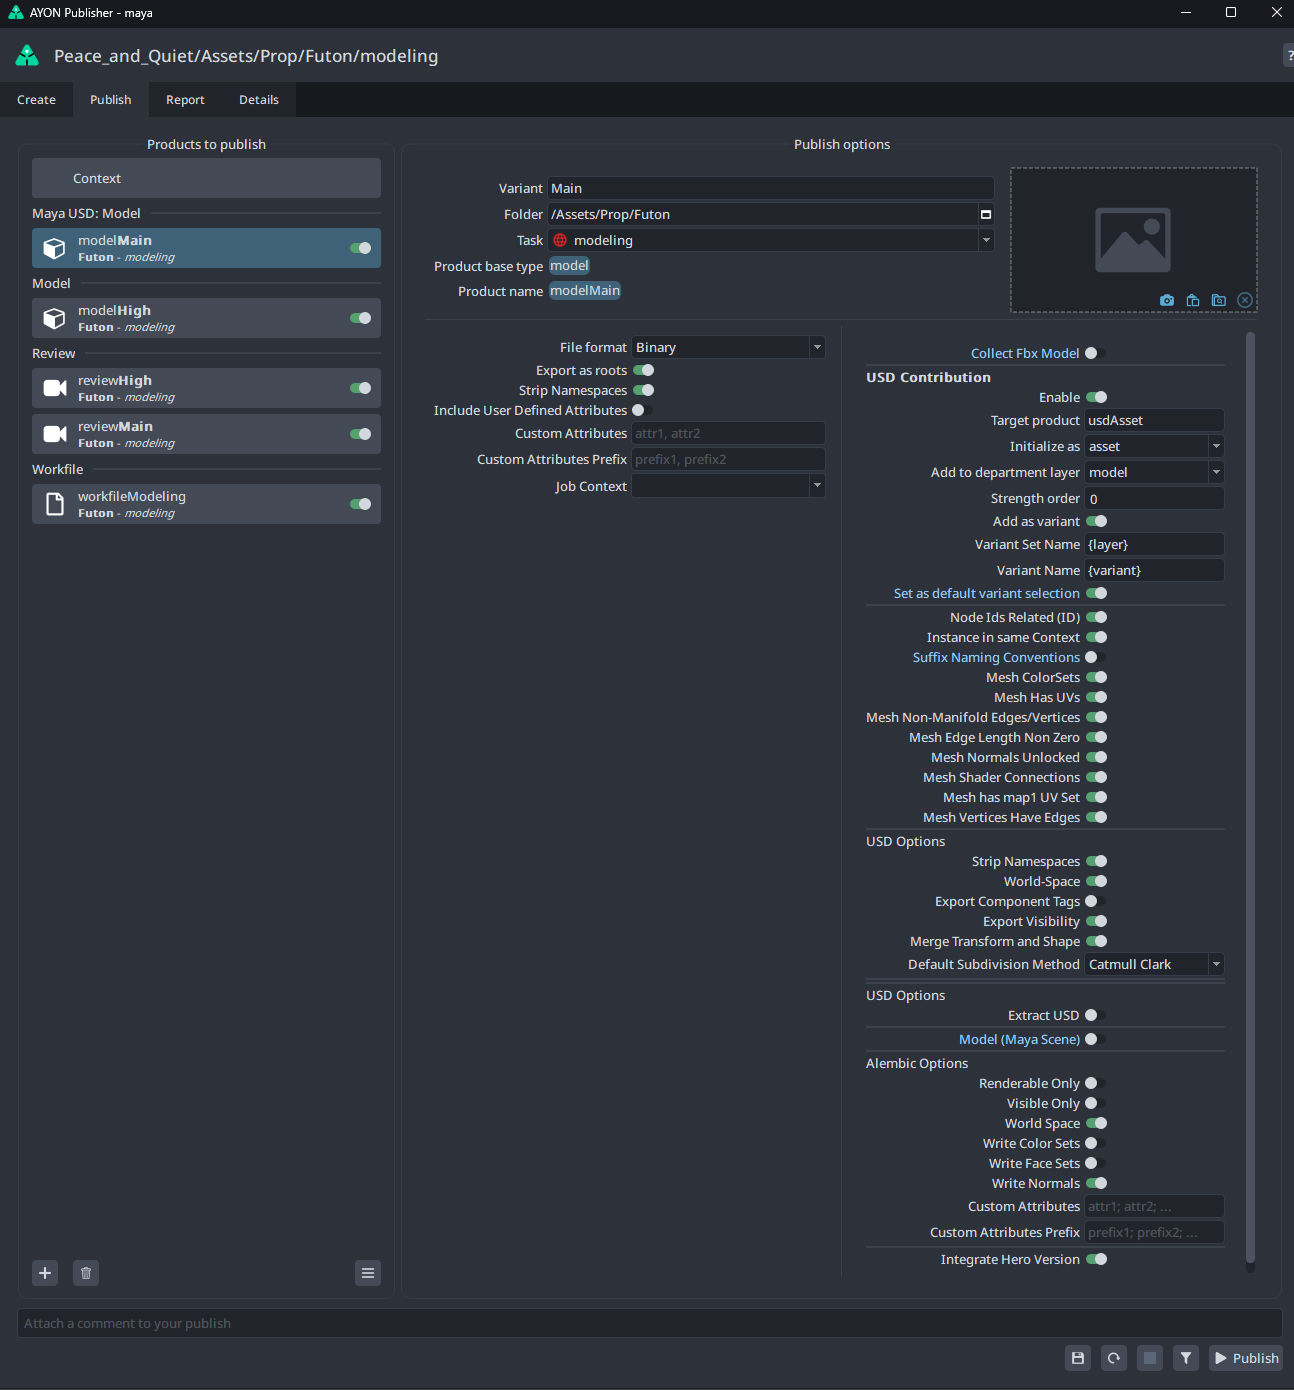
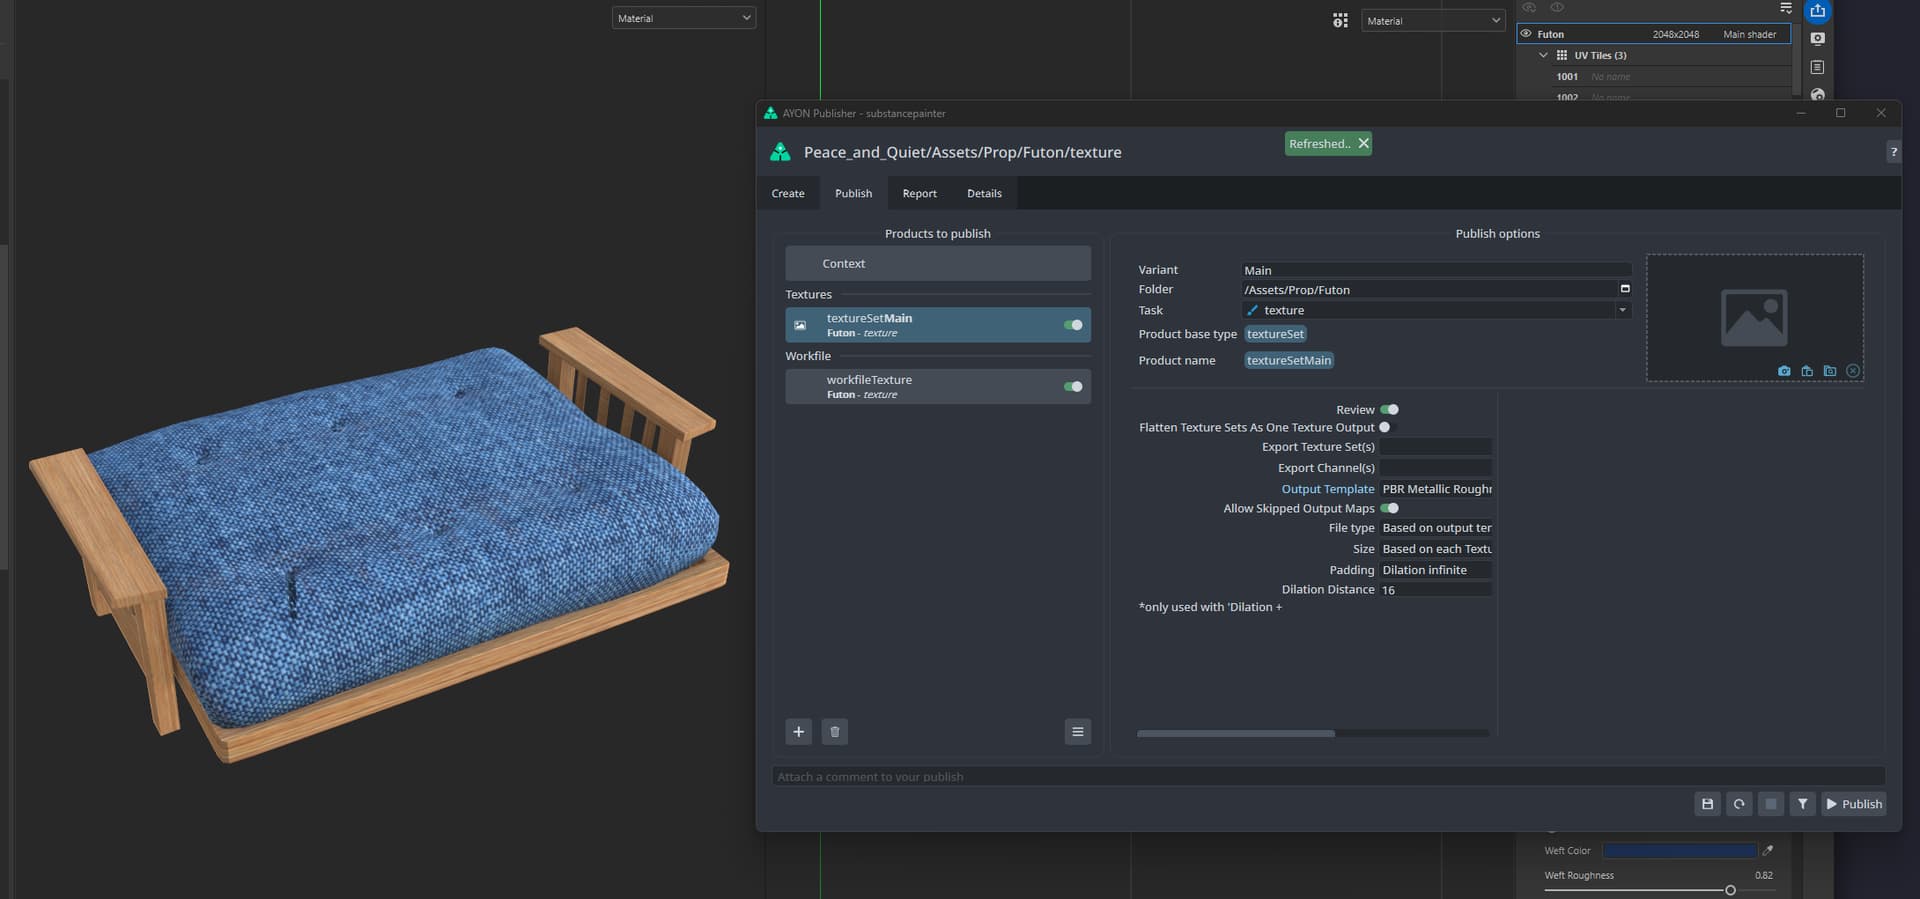
Texture (Substance Painter)
Launch from the AYON texture task. Load the usdModel (Main) layer into Substance.
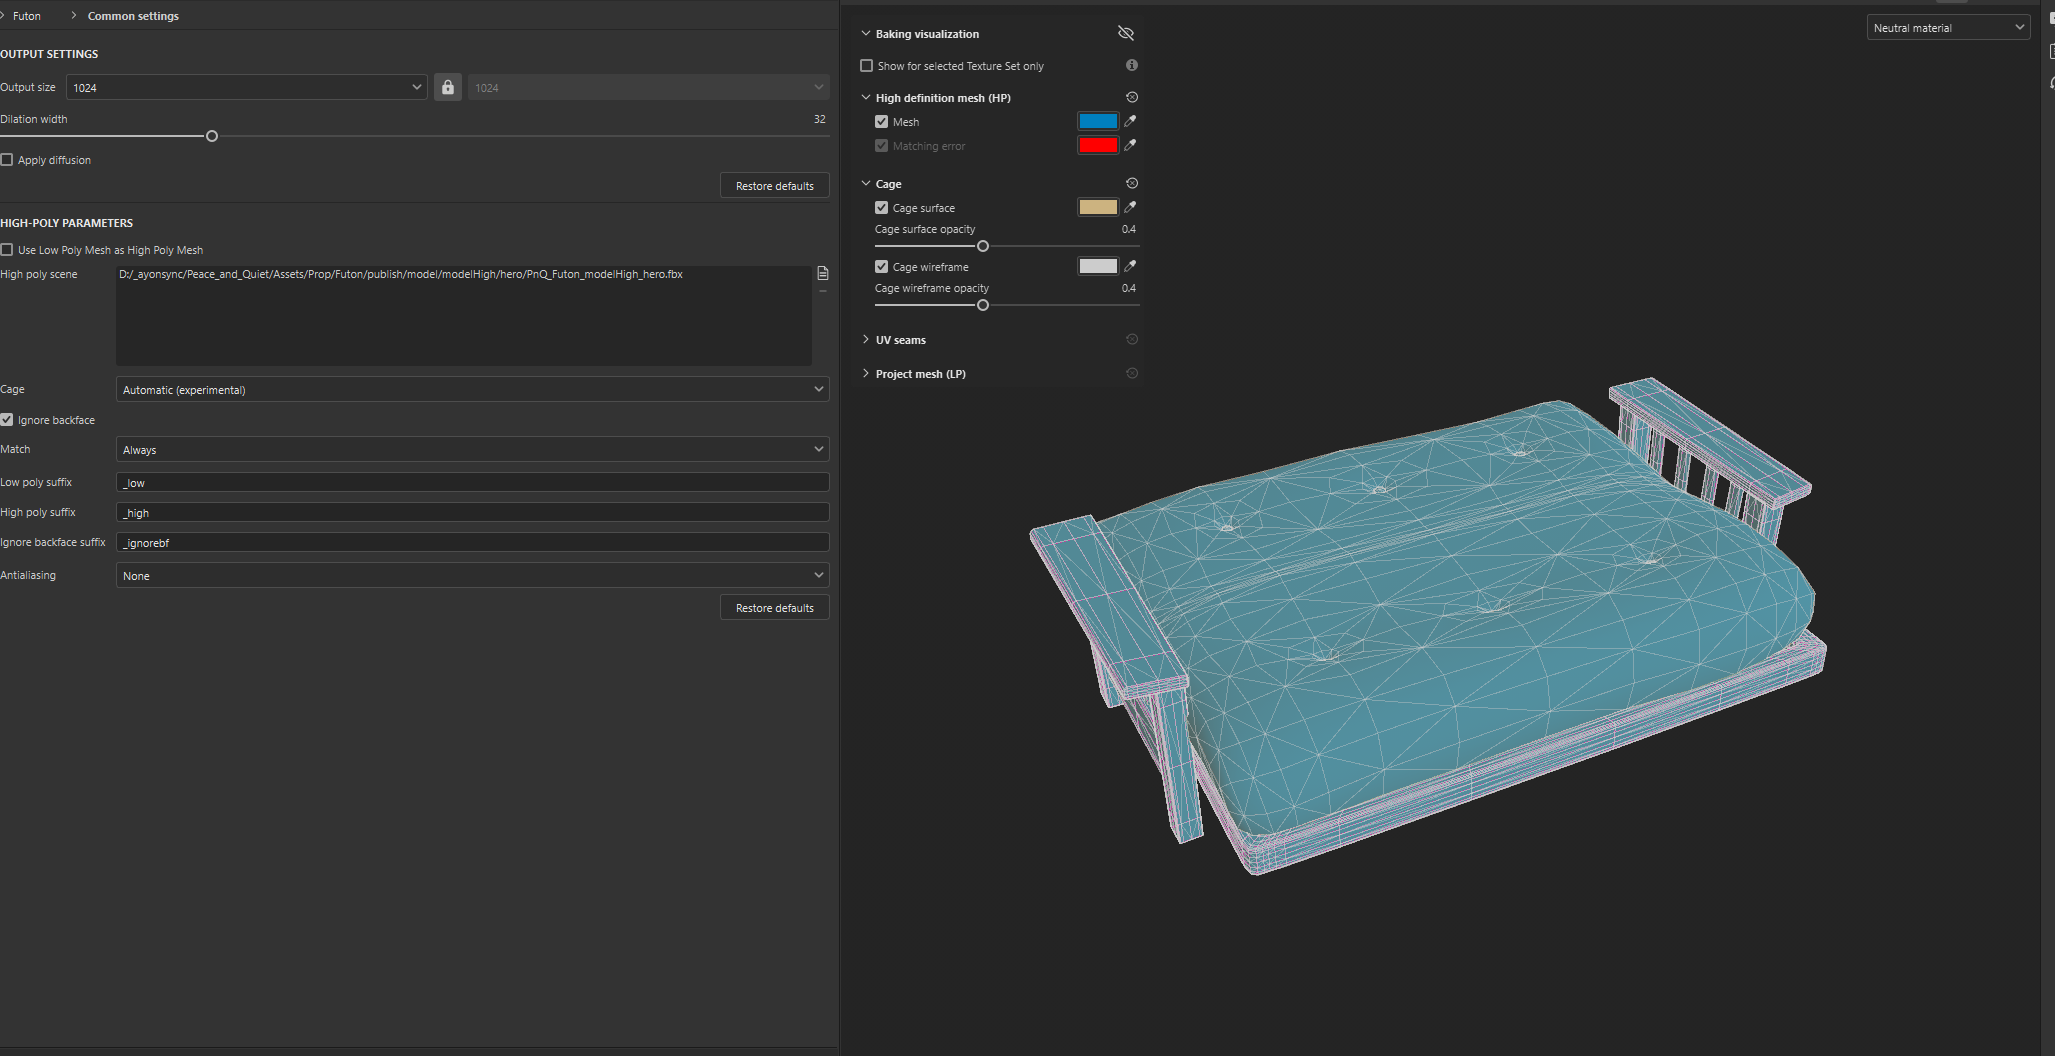
Baking uses the High poly publish and ID maps from Maya. Since there’s no direct AYON integration in Substance for this, you load the High path manually — open the AYON browser, copy the file path for the high product, and paste it into Substance’s bake settings.
Build your materials, then publish using the pipeline-specific PBR Metallic output preset available in the export dropdown. This publishes a set of image files into AYON that feed directly into the lookdev task.
Lookdev (Houdini)
Launch from the AYON lookdev task. The template auto-loads the usdModel layer and the texture maps published from Substance.
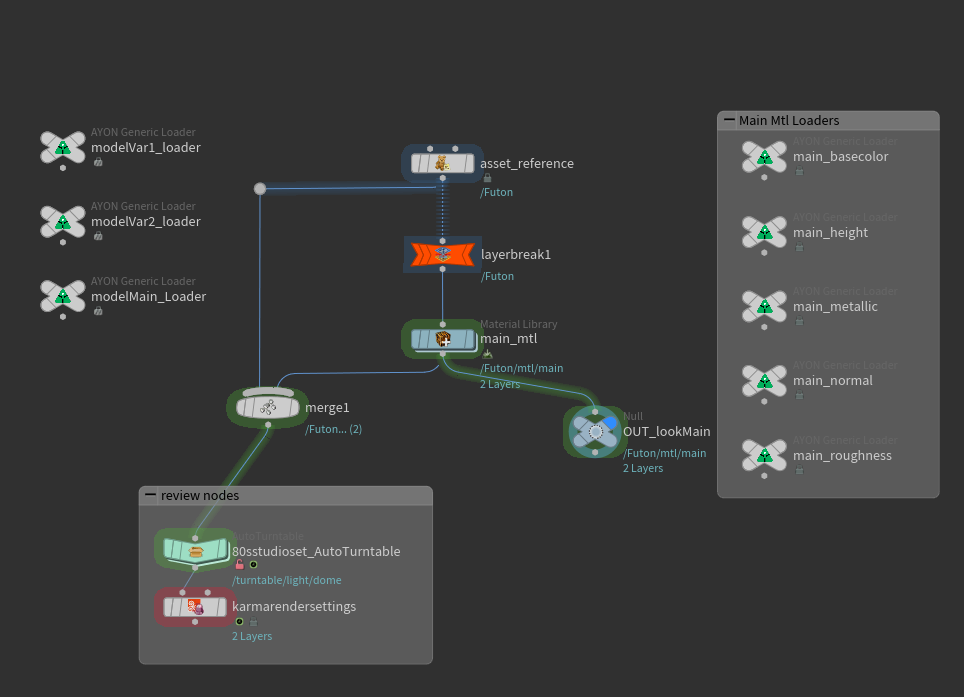
For simple assets with a single texture set, everything wires up automatically on open. Inspect in Karma to verify consistency with Substance Painter, then publish the usdLook layer.
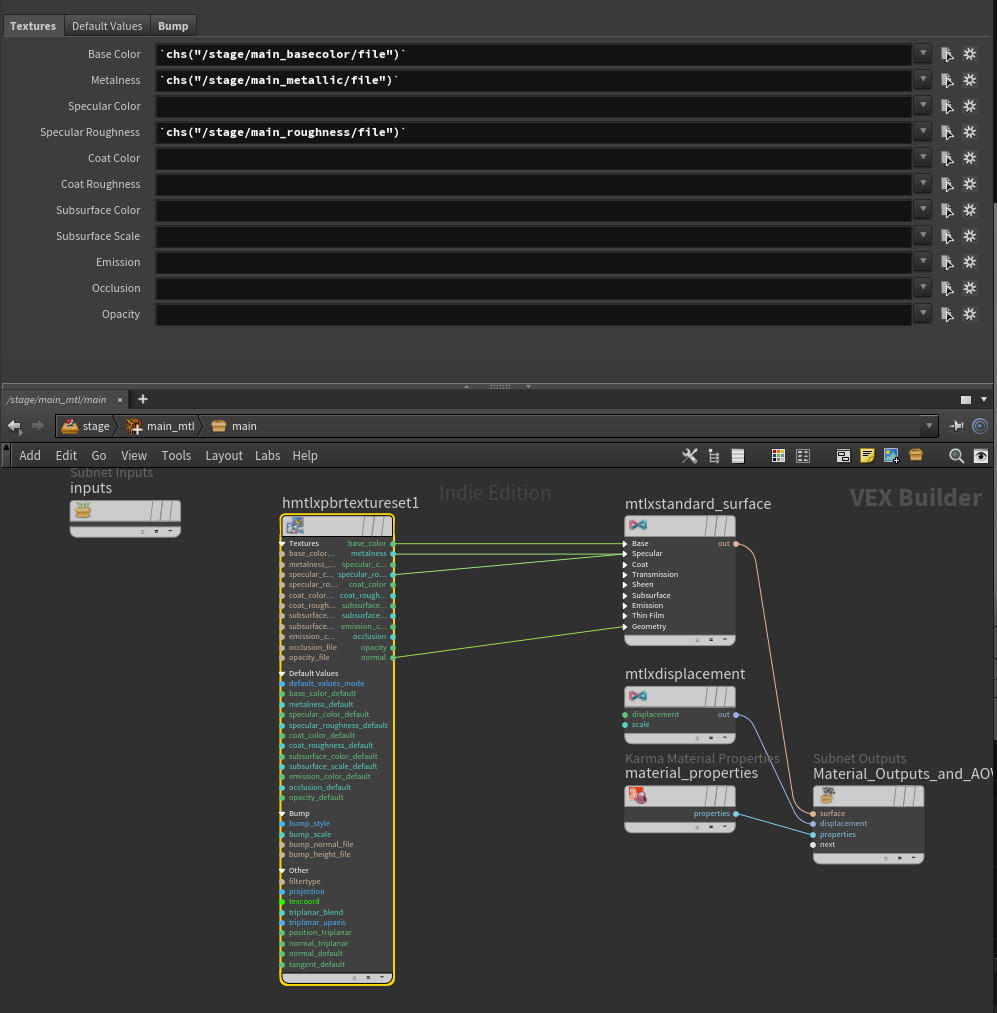
For more complex assets with multiple texture sets, you’ll manually load all the needed images from AYON and build out the MaterialX node structure, assigning geo to the correct materials.
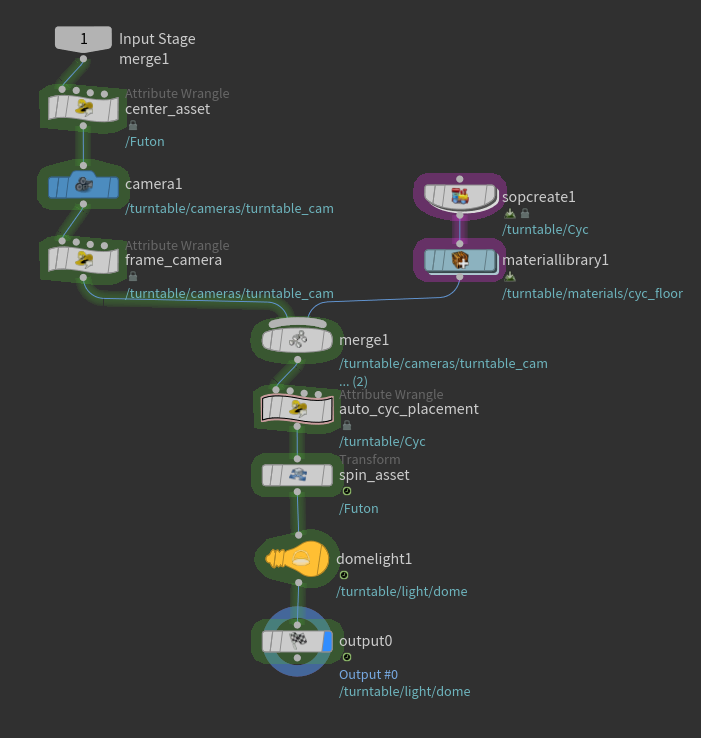
The lookdev also has some pieces for review, we have a turntable setup as a part of the lookdev template that will place a cyc wall and turn the asset the same 8frame rotation as the maya modeling template.
The usdLook layer is the second contribution to the usdAsset. At this point the asset is pipeline-complete and ready for assembly.
assetFX (optional)
Any additional FX work contributes an additional layer to the usdAsset as needed. An asset doesn’t need this to be considered done.
The complete usdAsset is a composition of layers:
usdModel— geometry (from Maya)usdLook— materials and textures (from Houdini lookdev)usdFX— optional FX layer
Stage 4: Set Dress
Set dress is a second wave of the same greybox → breakdown pipeline, running in parallel while the first wave of assets are being worked on.
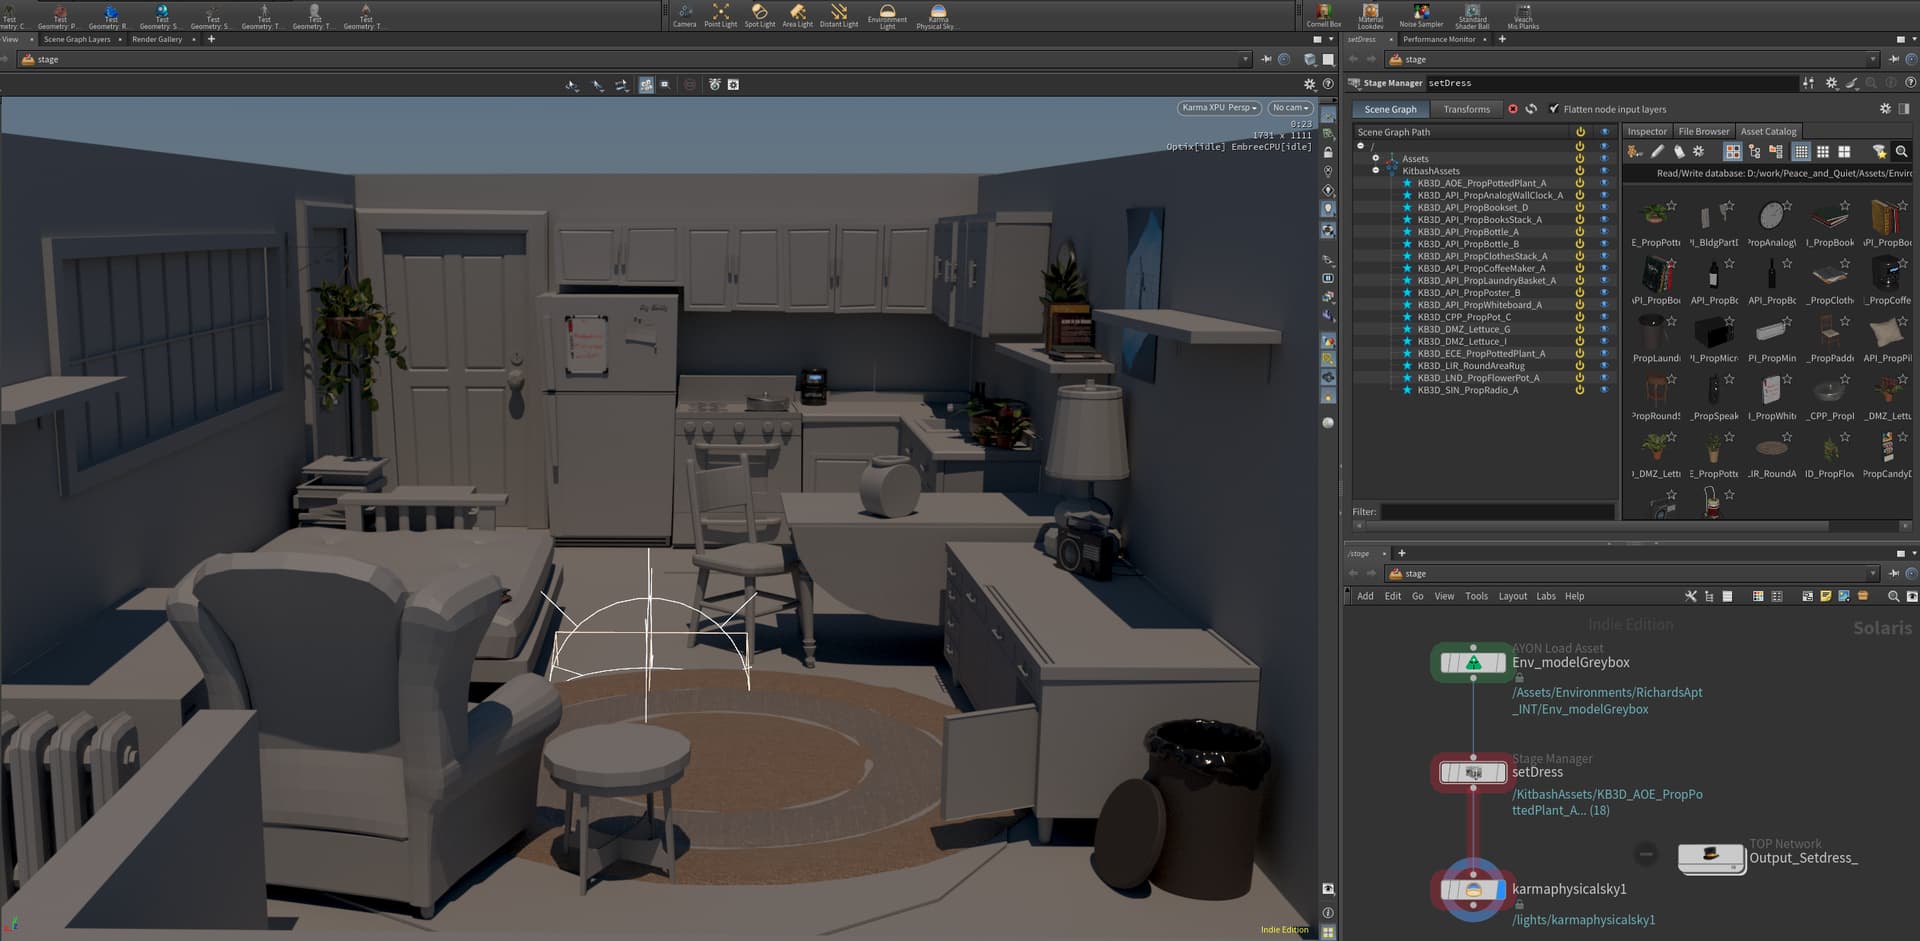
Launch through AYON in Houdini. The full modelGreybox loads as context so you can see the whole room while placing secondary and smaller props. Houdini’s placement tools make this fast and art-directable.
On publish, the same breakdown automation runs: new assets get AYON entries, greybox[assetname] products are published, and the full asset track (modeling → texture → lookdev) kicks off for each new item. The publish also produces usdSetDressLOC — the placement layer for the second wave of assets — which feeds into assembly alongside the original usdGreyboxLOC.
Stage 5: Assembly
This is the payoff for all the naming discipline and LOC work from Stage 1.
Open the assembly scene through AYON. The breakdown template system auto-populates the scene with:
- All
usdAssetsmarked for that environment (fully textured, lookdev complete) usdGreyboxLOC— wave 1 placement datausdSetDressLOC— wave 2 placement data
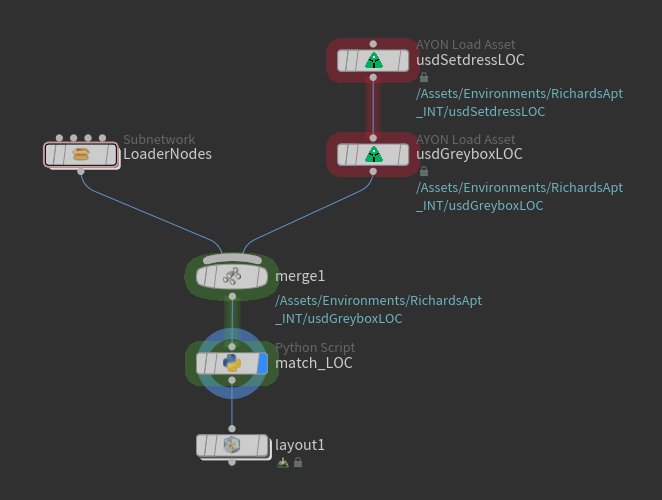
Match_LOC(assembly).txt (11.4 KB)
The LOC data and the usdAssets merge by matching names. Every asset snaps into the position defined by its corresponding _LOC, at the correct pivot and anchor point, automatically. The result is a fully dressed, fully textured environment composed of usdAssets from AYON.
Publish as usdEnvironment — ready for shots and animation.
We’re documenting the shot and animation side of this pipeline and will share that in a follow-up post once we have it locked down. Happy to answer questions on any of the stages above! Or if you have any suggestions for improvements let me know!